Project Case Study

Coastal Calm: A Jack-and-Jill Bathroom & Tub-to-Shower Remodel

Lake Shore — Vancouver, WA

The Hughes family’s Jack-and-Jill bathroom had all the parts of a good bathroom and none of the room. A wall and a door split it into two cramped halves, each with its own awkward vanity; two separate entrance doors ate the wall space; and a small tub filled the far end. We took out the dividing wall, closed off the door nobody used, built a custom stained wood double vanity along the wall we reclaimed, and converted the tub into a walk-in shower lined with one-piece quartz slabs — no grout lines to scrub, seal or redo.
Client
The Hughes
family
Location
Lake Shore
Vancouver, WA
Scope
Jack-and-Jill layout
& tub-to-shower
Shower
Quartz slab walls
frameless slider
Investment
$35,000–$50,000
all-in
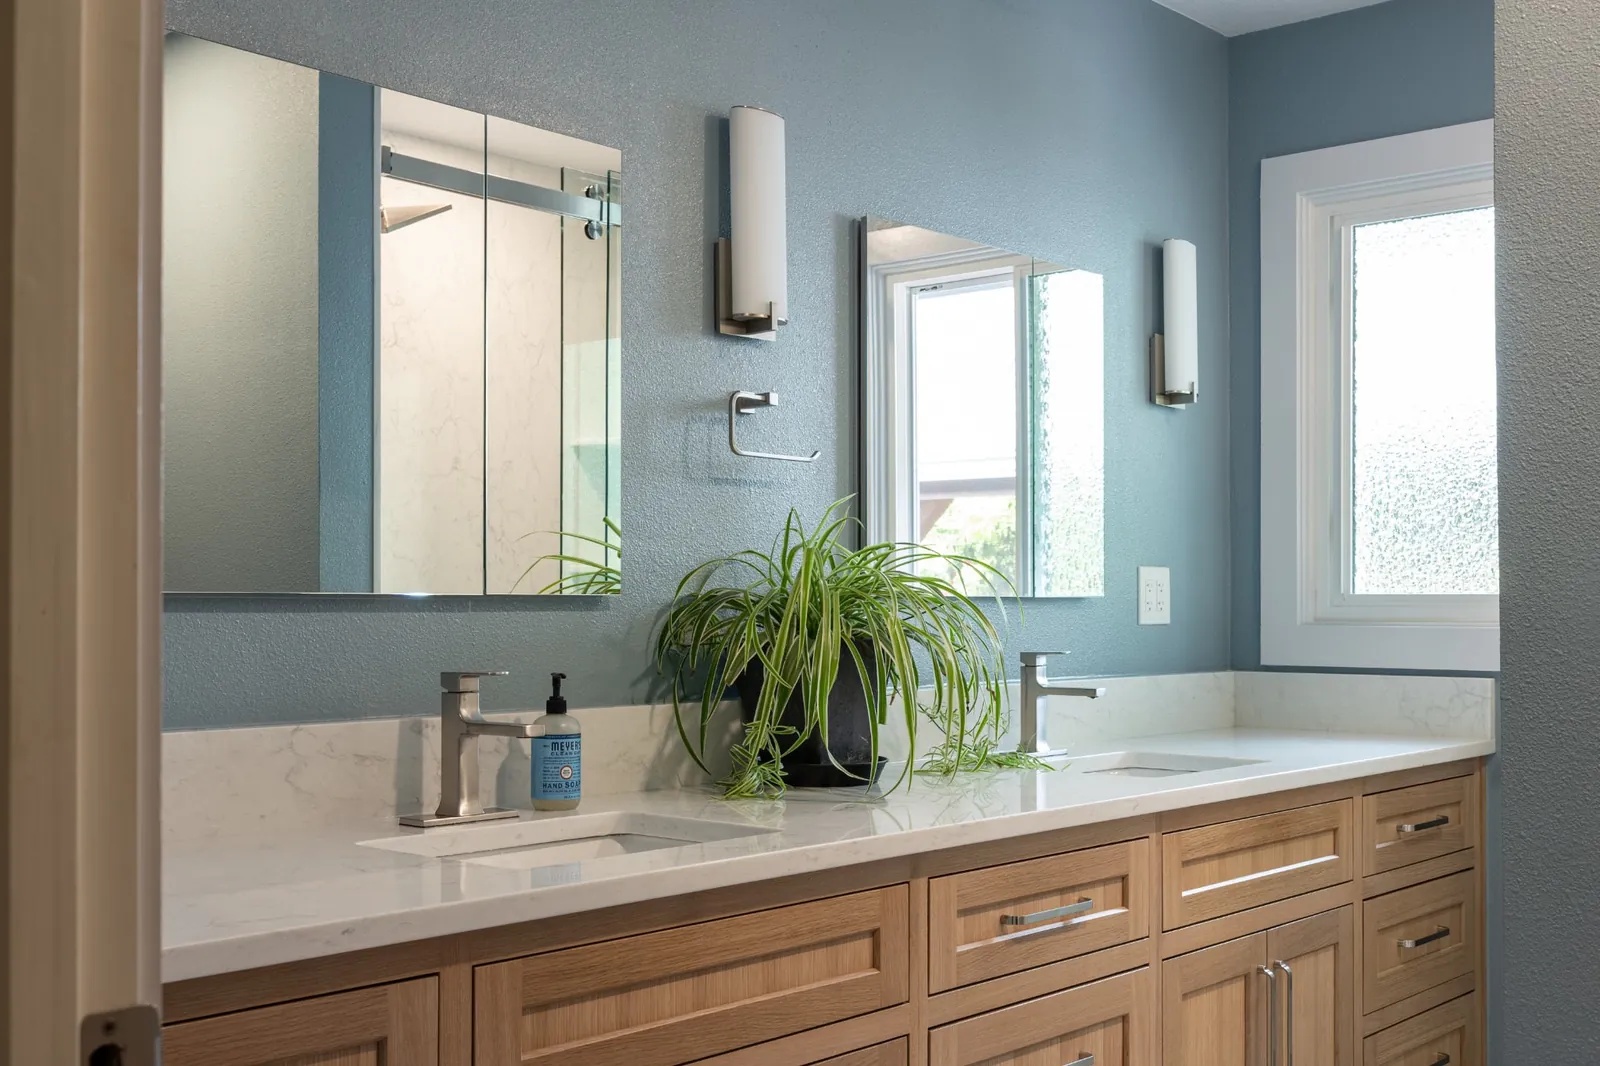
Custom stained wood double vanity with a white quartz top, two undermount sinks, symmetrical mirrors and wall sconces in a remodeled Lake Shore, Vancouver, WA bathroom
The finished vanity wall: one continuous double vanity running through the space that used to hold a dividing wall and a second door.
The Starting Point

Two small bathrooms pretending to be one

A Jack-and-Jill bathroom is meant to be shared between two rooms. This one was shared between the hallway and the primary bedroom — and it had been laid out as if it were two separate bathrooms stitched together. A partition wall with its own door ran across the middle. On one side sat a long tiled vanity with a single drop-in sink; on the other side, a second, smaller vanity was pushed up against the toilet and the tub.

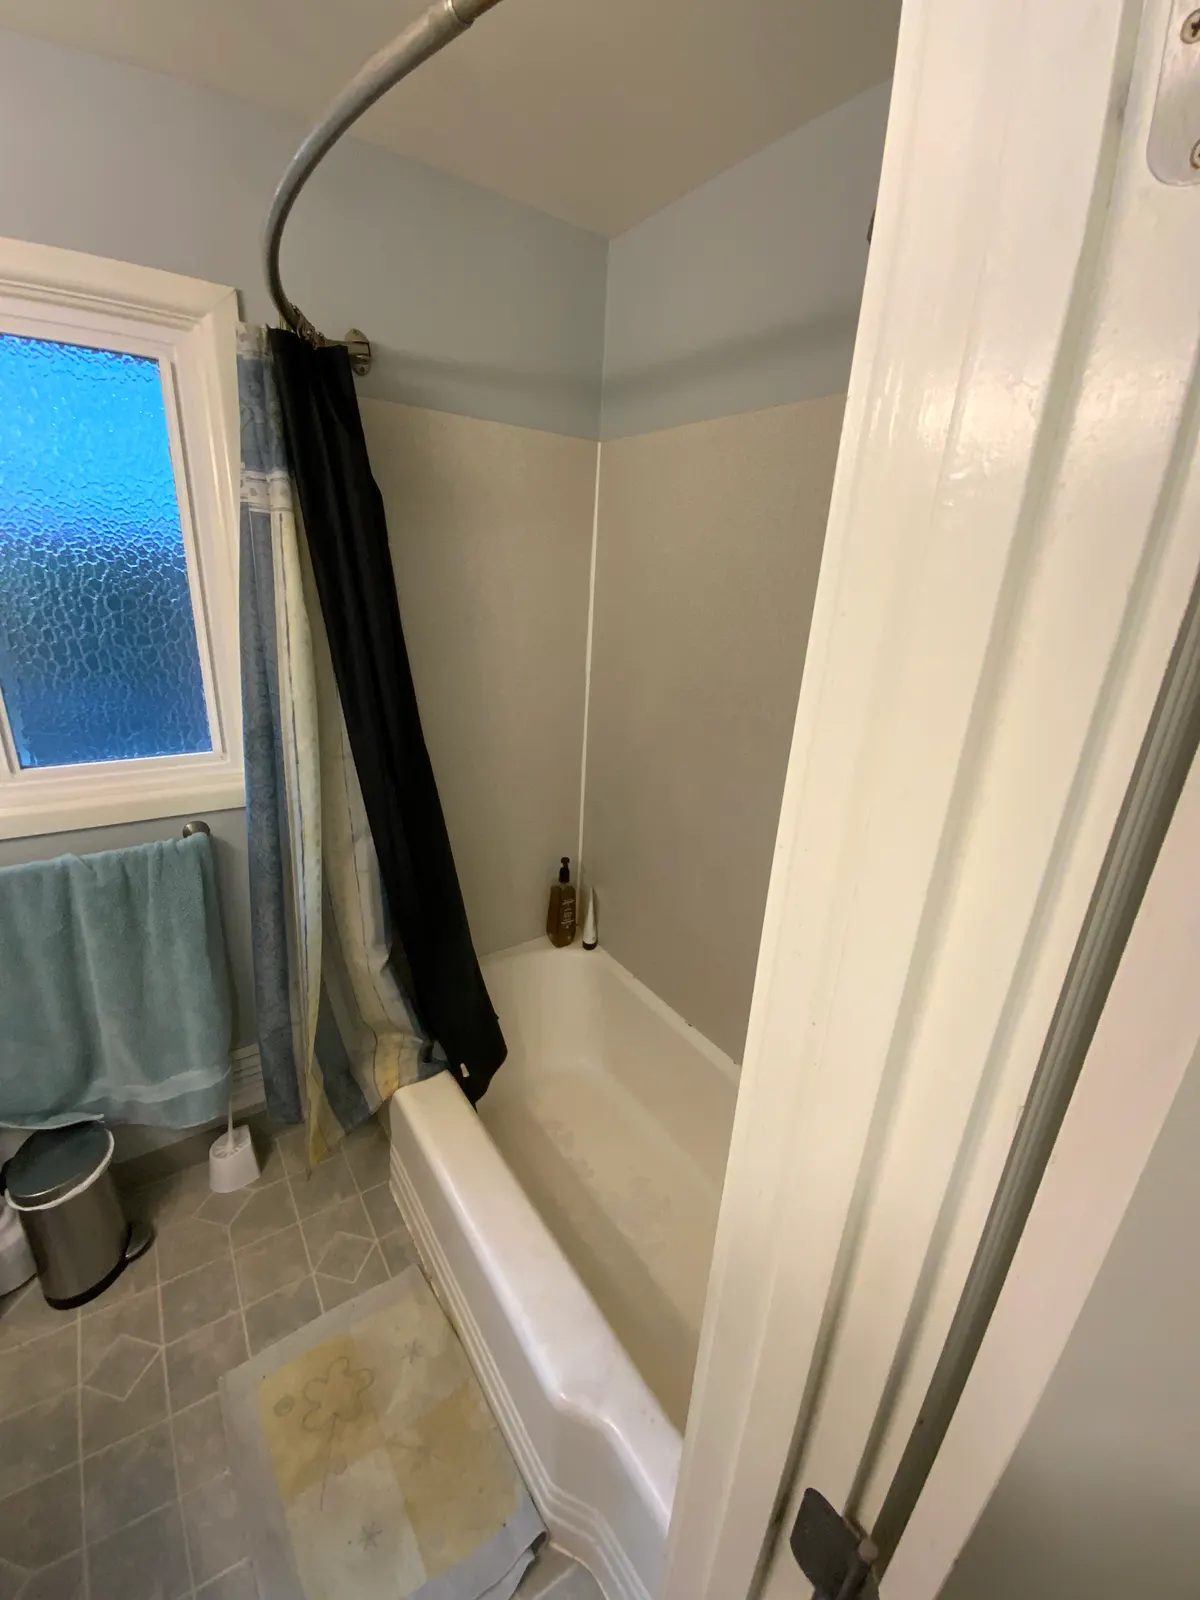
Two entrance doors, one from the hallway and one from the primary bedroom, meant two door swings and two walls that couldn’t hold anything. In practice the family only ever came and went through the hallway door. At the far end, a small alcove tub with an acrylic surround and a curved curtain rod did double duty as the only shower, and the vinyl floor, tile-topped vanity and plate mirror all dated from the original build.
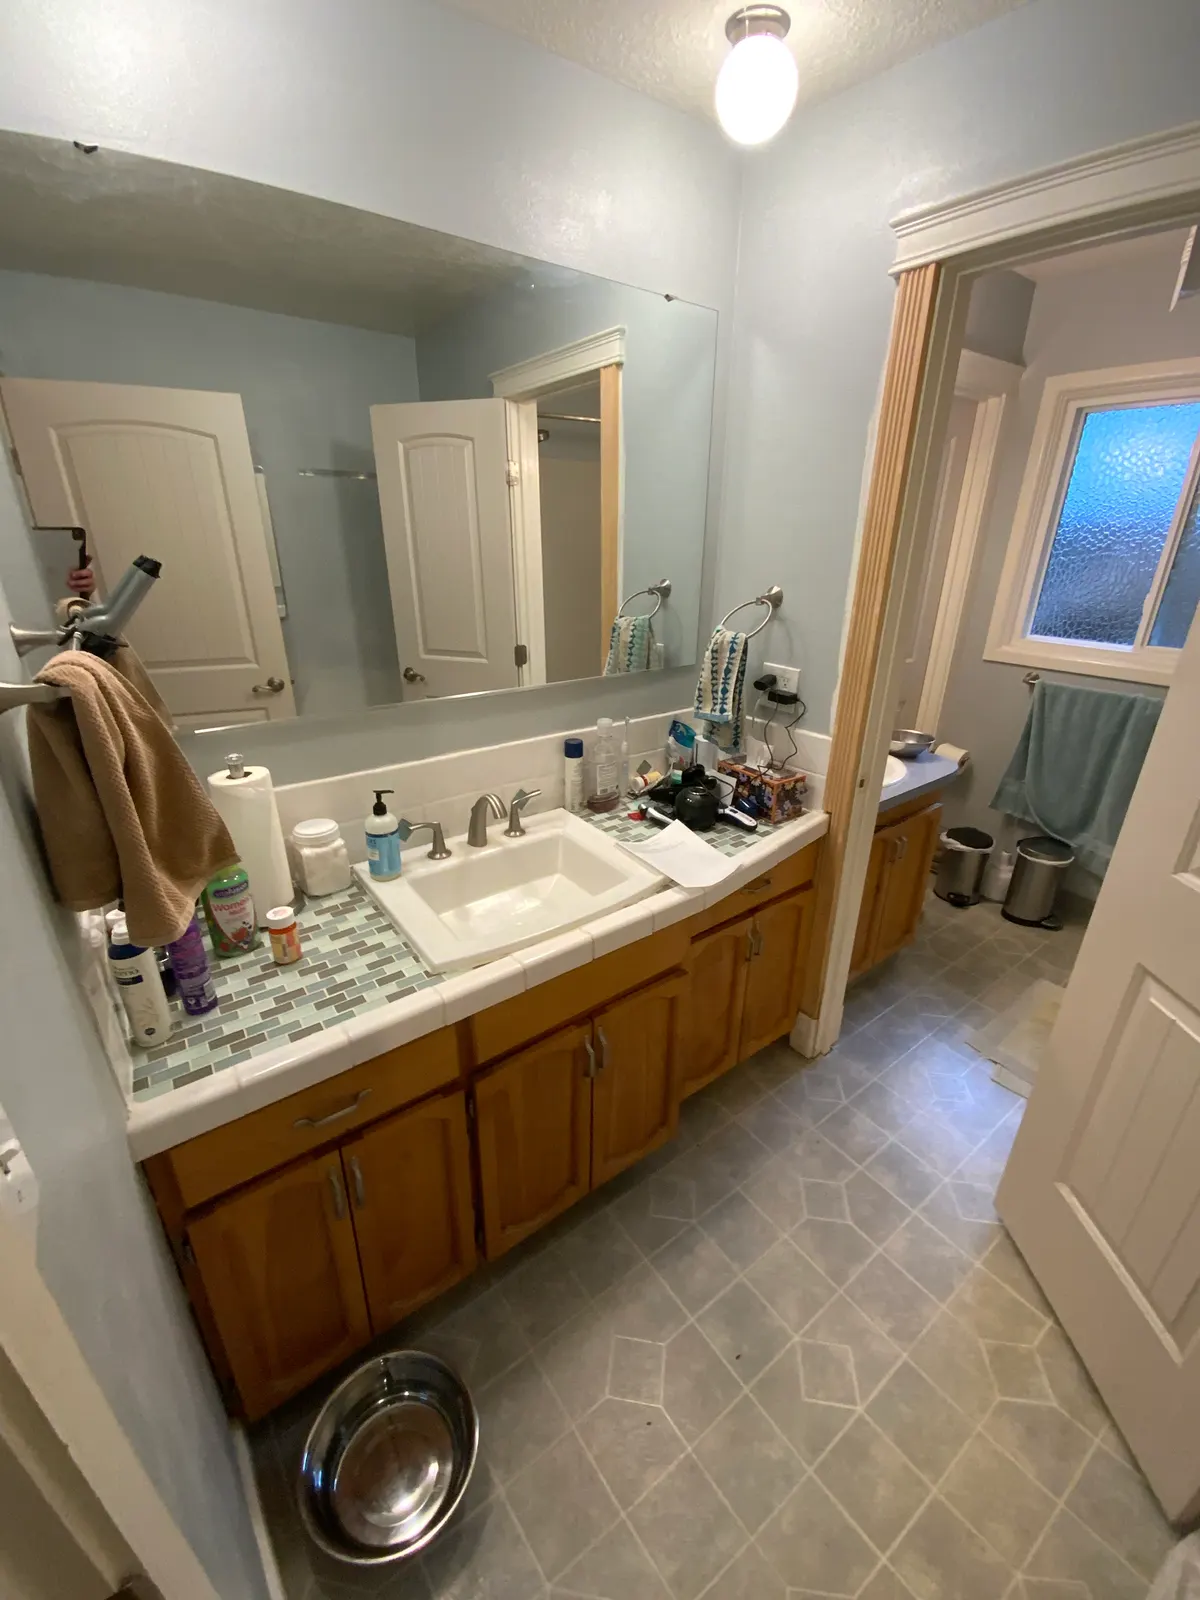
The original Jack-and-Jill bathroom before remodeling: a tile-topped oak vanity on one side of a partition wall, with a second vanity visible through the doorway beyond
Before One vanity, a partition wall, and a second vanity behind it
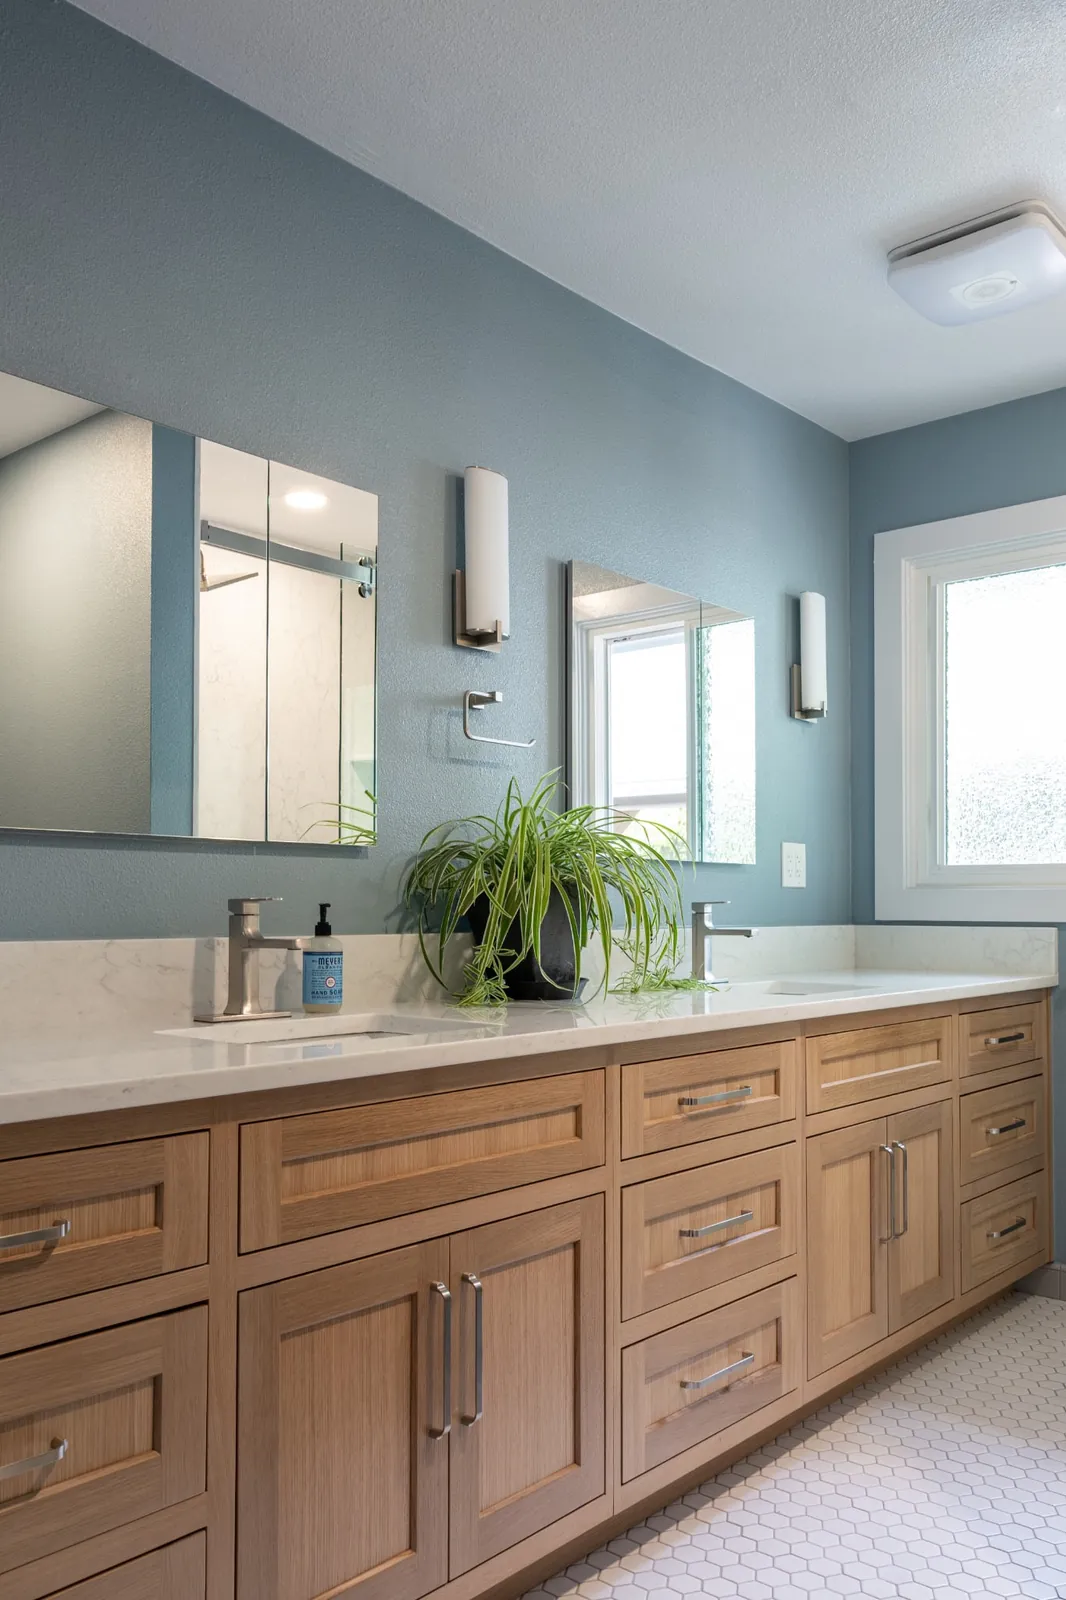
The same bathroom after remodeling: one long custom stained wood double vanity with a quartz top running where the partition wall used to stand
After One continuous double vanity, wall gone
The original small alcove bathtub with an acrylic surround and a curved shower curtain rod before the tub-to-shower conversion
Before A small tub, acrylic surround and a curtain
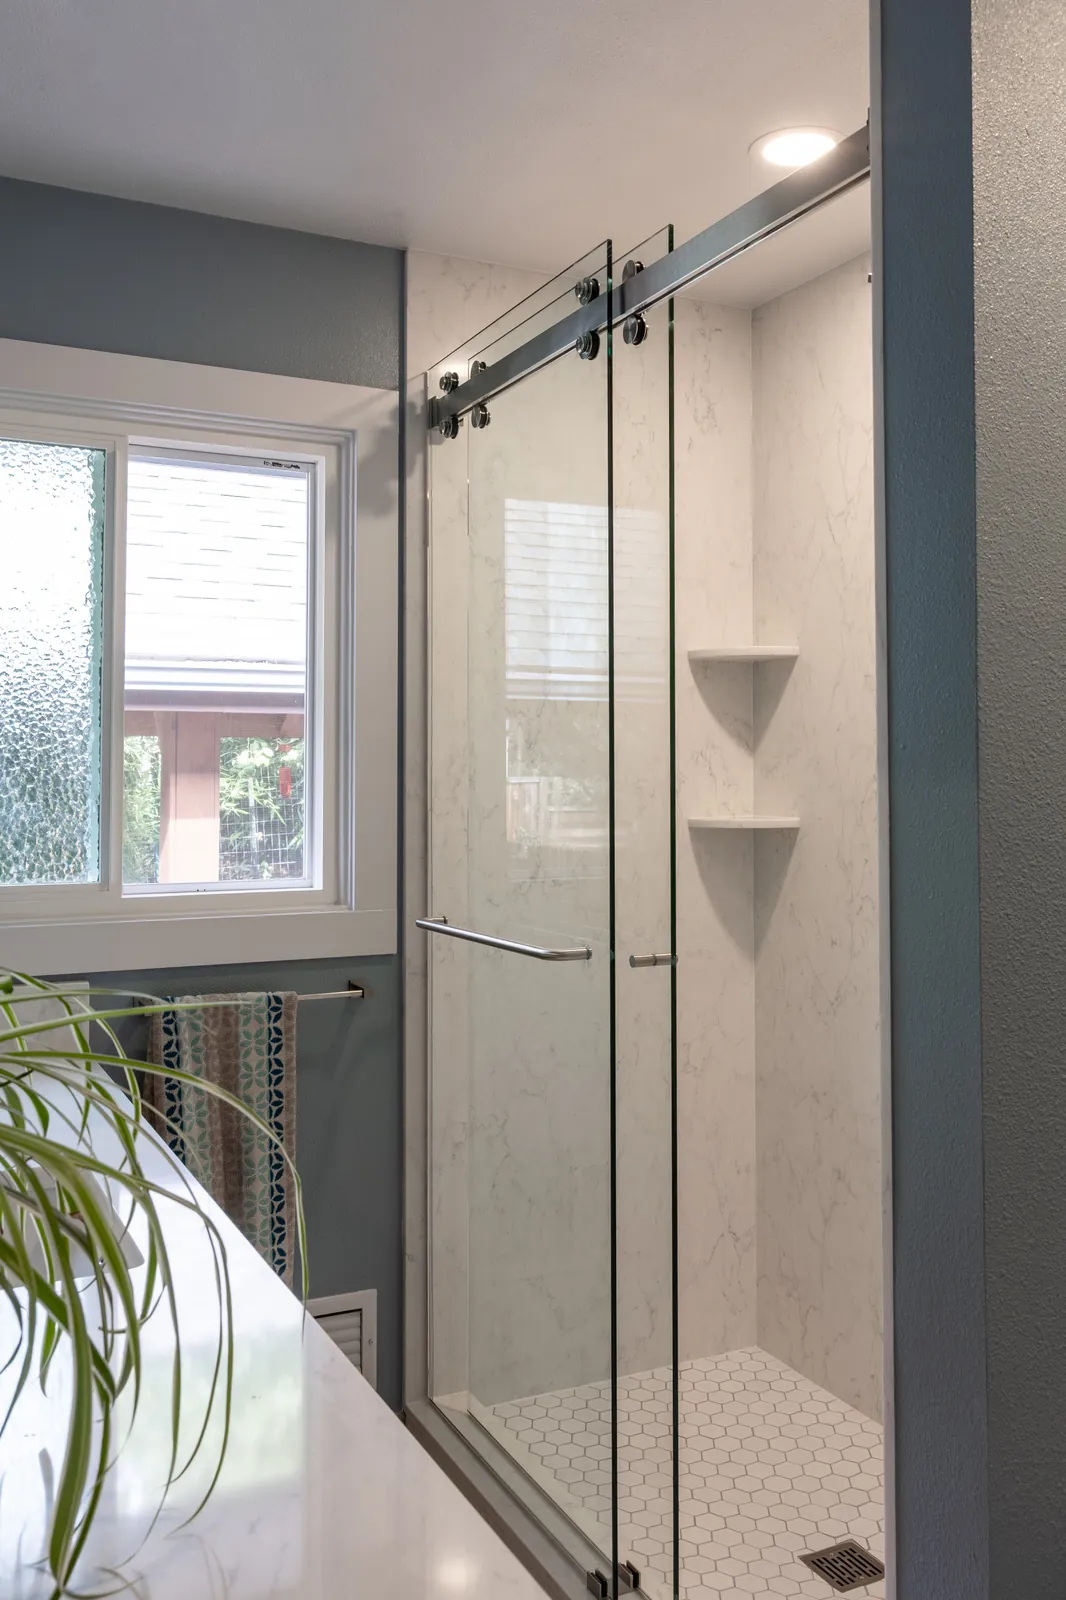
The same alcove after the tub-to-shower conversion: a walk-in shower with quartz slab walls, hexagon tile floor and a frameless sliding glass door
After A walk-in quartz slab shower behind frameless glass
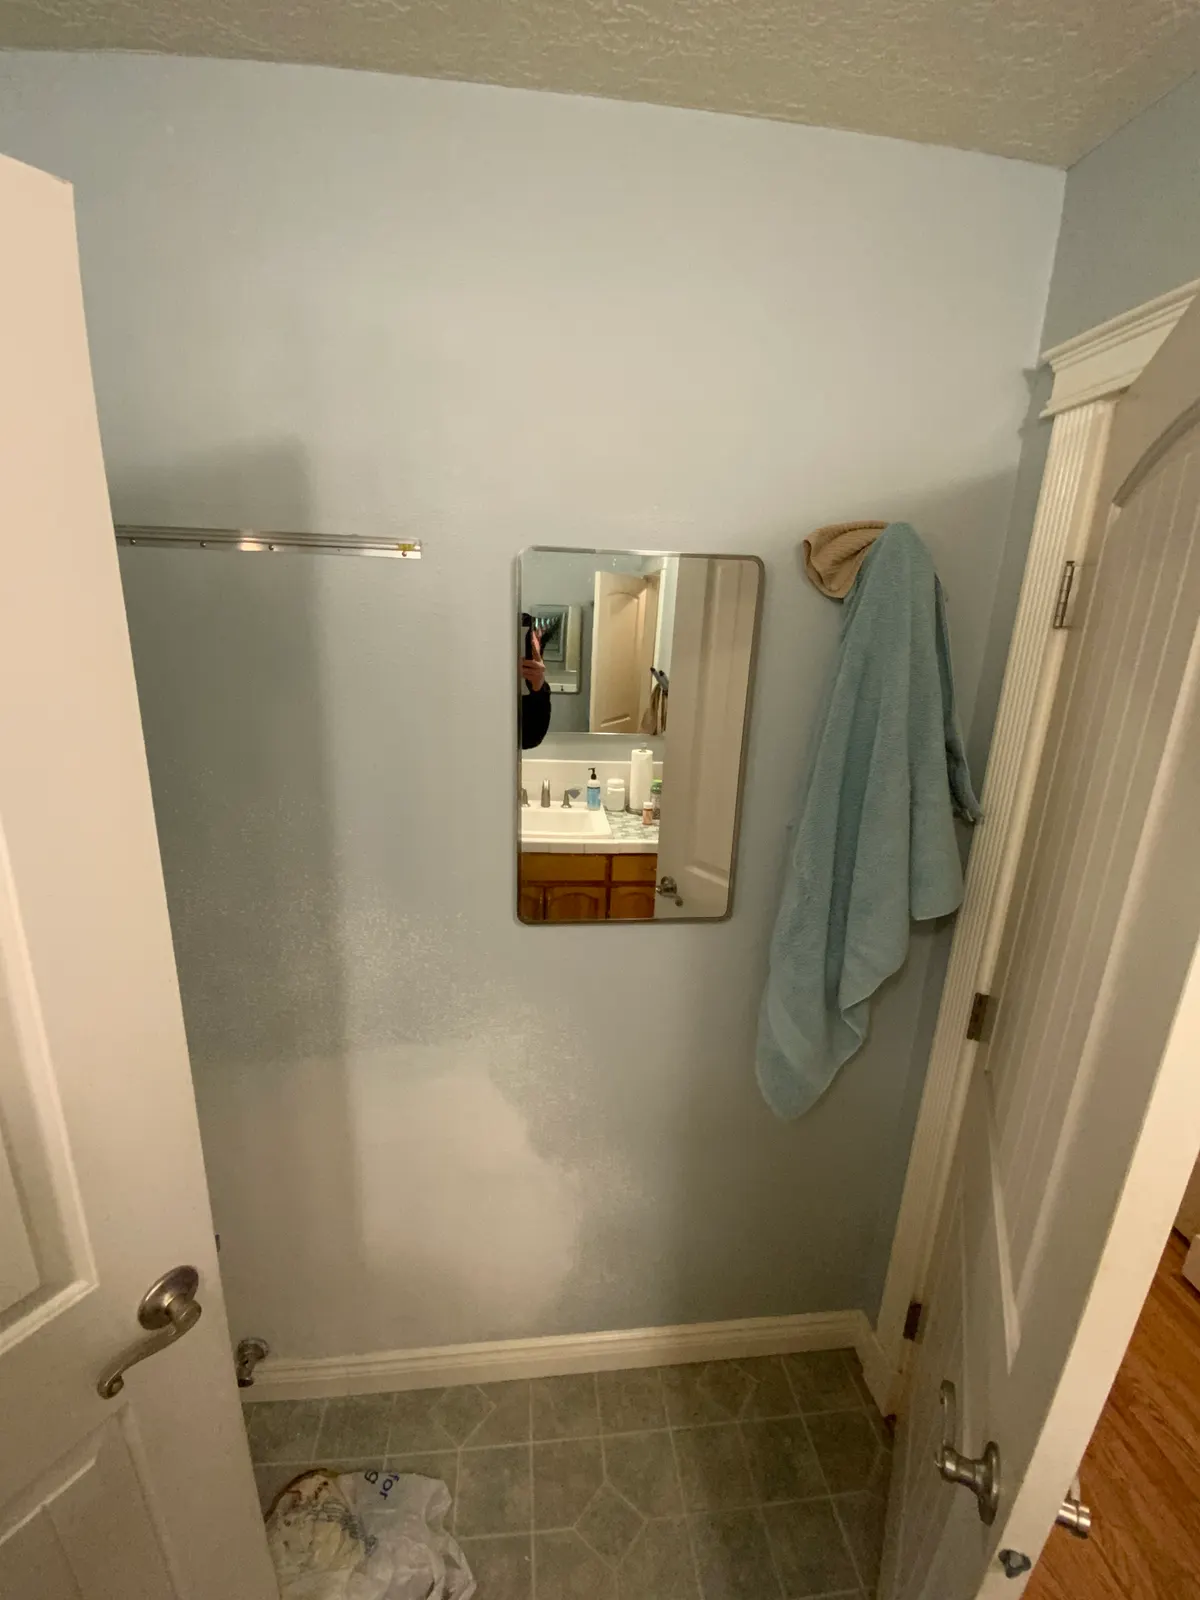
Before remodeling: a blank wall between the hallway door and the primary-bedroom door that could not hold a vanity or storage
Before Dead wall between two doors
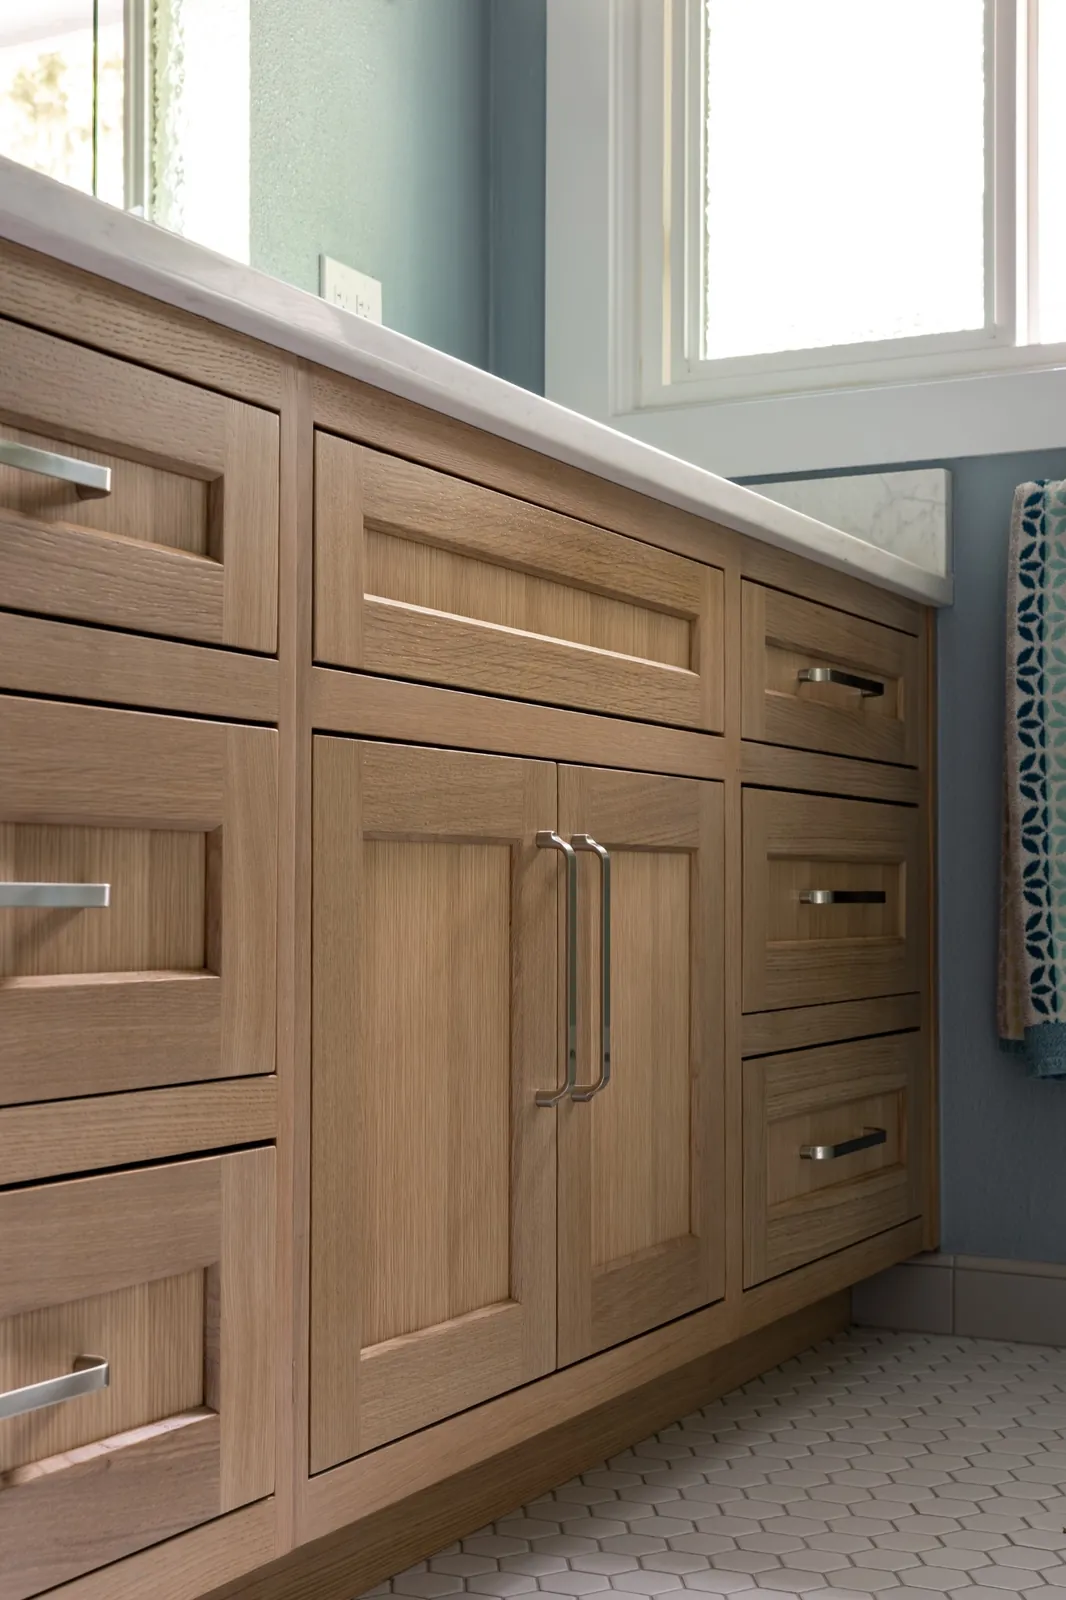
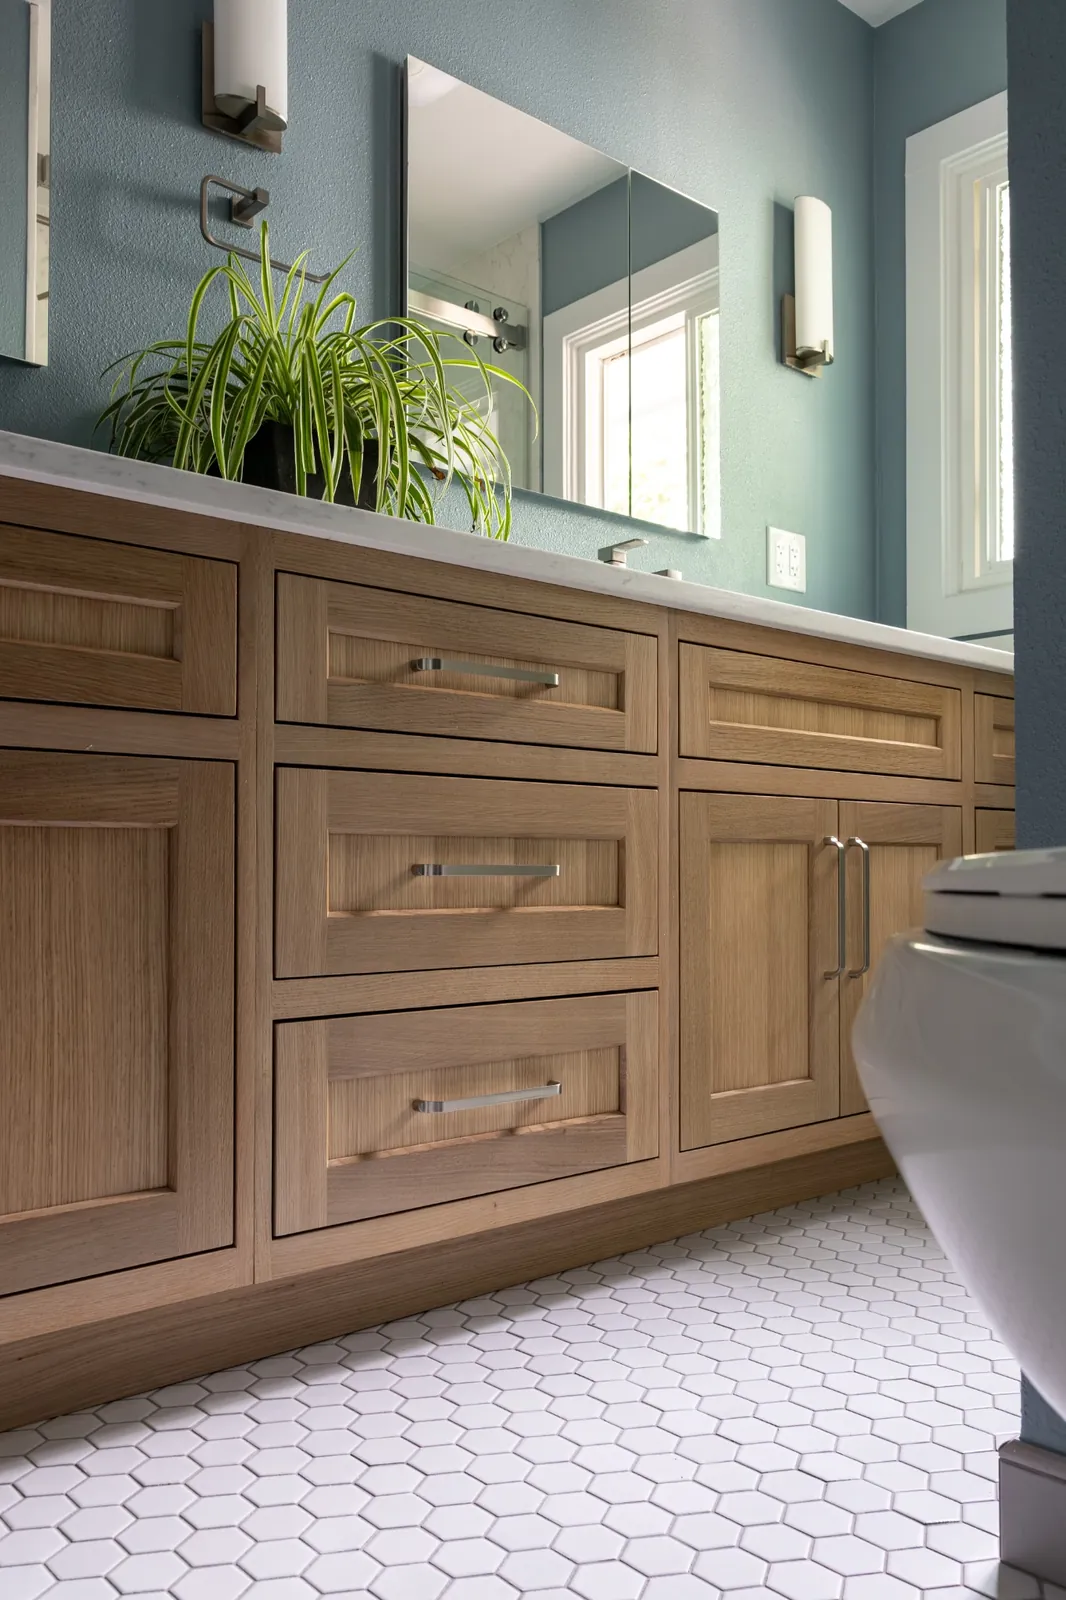
After remodeling: custom stained wood vanity cabinetry with shaker drawers and brushed metal pulls built into the reclaimed wall
After Drawers and cabinets where the door used to be

All four of the original photos are below — select any of them to open the full gallery.

Design & Construction Solution

Taking walls out, not adding square feet

The bathroom’s footprint didn’t change. What changed is how much of it could be used. Taking out the partition wall turned two half-rooms into one, and closing the door to the primary bedroom gave back a full run of wall. The hallway door stayed as the single entrance, which is how the family already used the room.

That reclaimed wall — the old partition plus the old doorway — is where the new double vanity went. Instead of two short vanities in two separate spaces, there is now one long custom cabinet with two sinks side by side and far more drawer and cabinet storage than both old vanities put together. At the other end, the tub came out and a walk-in shower went into the same alcove, so the plumbing stayed where it was.

The palette is what gives the room its name: soft coastal blue walls, warm stained wood, white quartz and white hexagon tile. It reads calm and bright without being stark, and the light colors keep a mid-sized bathroom feeling open.

01

Remove the wall that split the Jack-and-Jill

The partition wall and its door came out, opening the two halves of the bathroom into a single room with one clear line of sight from the hallway door to the window.

02

Close the door nobody used

The entrance from the primary bedroom was framed in and finished on both sides. One fewer door swing, and a full wall freed up for cabinetry. The hallway door stayed.

03

Build one custom double vanity along the reclaimed wall

We built and installed a custom stained wood vanity that runs through the old wall and doorway, with a quartz countertop, two undermount sinks, two symmetrical mirrors and matching vanity lights over each sink.

04

Convert the tub to a quartz slab walk-in shower

The small tub was replaced with a custom walk-in shower lined in quartz slabs fabricated in our shop, a hexagon tile shower floor, and a custom frameless sliding glass door.

The Shower

A grout-free quartz slab shower

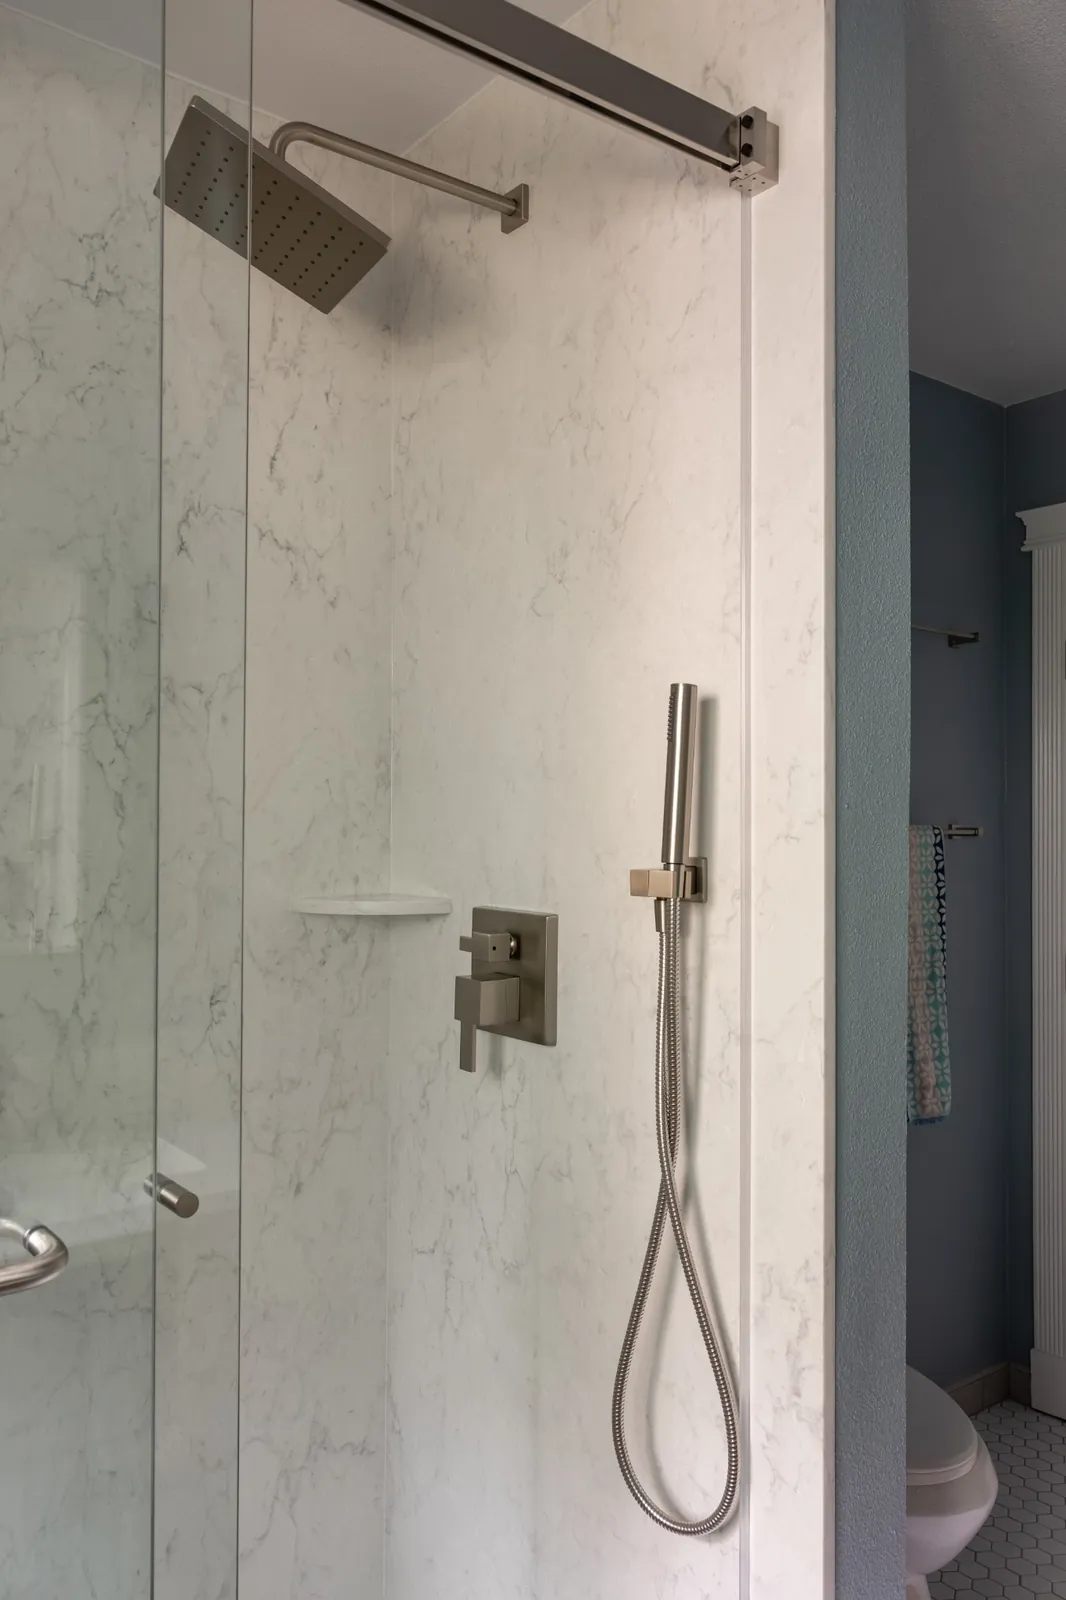
Most tiled showers are hundreds of tiles held together by grout — and grout is what stains, grows mildew and eventually has to be scrubbed, resealed or ripped out and redone. For this tub-to-shower conversion we lined the walls with large quartz slabs instead. Each wall is essentially one piece, so there are no grout lines to clean and nothing to regrout down the road.

The slabs were templated to the framed shower, cut and fabricated in our shop, then delivered and installed on site. Full-height quartz slabs are heavy and unforgiving to handle, and setting them took a crew of four. Matching quartz corner shelves stand in for a tiled niche, and the shower floor is white hexagon tile — the small format gives bare feet grip and slopes cleanly to the drain.

A custom frameless sliding glass door closes it in. A slider needs no swing clearance, which matters in a bathroom where the vanity and the shower share the same walkway, and the clear glass keeps the quartz visible from the doorway so the room feels bigger.
  • No grout lines on the walls — wipe-down cleaning
  • Non-porous quartz that doesn’t need sealing
  • Nothing to regrout or redo in ten years
  • Shop-fabricated slabs, installed by a crew of four
  • Low-threshold entry in place of a tub wall
Quartz slab shower walls with a square rain head, handheld shower wand and brushed nickel controls
Scope of Work

Everything that changed

This was a full remodel of the Jack-and-Jill bathroom, from layout to fixtures. Our in-house crew handled demolition, framing, the custom vanity build, quartz fabrication and installation, tile and finish work, with licensed, vetted trade partners on the plumbing and electrical scopes. One Serden Group project manager coordinated the schedule from the first walkthrough to the final punch list.
  • Demolition of both vanities, the tub, surround and flooring
  • Removal of the partition wall and its door
  • Primary-bedroom entrance framed in and finished on both sides
  • Plumbing reworked for a two-sink vanity on one wall
  • Electrical for twin vanity lights and new ceiling lighting
  • Tub-to-shower conversion with a waterproofed shower floor and drain
  • Shop-fabricated quartz slab shower walls and corner shelves
  • Hexagon tile on the shower floor and the bathroom floor
  • Custom frameless sliding glass shower door
  • Custom stained wood double vanity, built and installed
  • Quartz vanity countertop with two undermount sinks
  • Two symmetrical mirrors and matching vanity sconces
  • Rain head, handheld shower and brushed nickel fixtures
  • Paint, trim and final punch list
The finished bathroom: soft blue walls, a warm wood double vanity with quartz top, a wide mirror and white hexagon tile floor
Materials & Products Installed

What went into the room

Every material in this bathroom was picked for low maintenance first and looks second — it is a family bathroom that gets used every day.

Shower walls
Quartz slabs in a soft marble-look white, templated to the framed shower, fabricated in our shop and installed in large one-piece panels. Matching quartz corner shelves.
Shower door
Custom frameless sliding glass door on a top-mounted roller rail, with a towel-bar style handle. No swing clearance needed.
Tile
White hexagon tile on the shower floor and carried through the bathroom floor, so the two read as one surface. Square drain at the shower floor.
Vanity
Custom stained wood double vanity, built and installed by our crew, with shaker drawer and door fronts and long brushed metal pulls. Sized to run the full length of the reclaimed wall.
Countertop & sinks
White quartz countertop with a matching backsplash and two undermount sinks, so there is no rim or grout line for water to sit in.
Mirrors & lighting
Two symmetrical mirrors, one centered over each sink, with a matching cylinder vanity sconce beside each one and new ceiling lighting.
Fixtures
Single-handle vanity faucets, a square rain shower head, a handheld shower wand and shower controls, all in brushed nickel.
Walls
Soft coastal blue paint with white trim — the color that gave the project its name.
How It Was Built

The build, step by step

A tub-to-shower conversion with a layout change has a fixed order: the walls have to move before anything is plumbed, and slab shower walls can only be templated once the shower is framed and waterproofed.

Step 1

Demolition and layout changes

Both vanities, the tub and surround and the old flooring came out. The partition wall and its door were removed, and the primary-bedroom entrance was framed in.

Step 2

Rough plumbing and electrical

Supply and drain lines were reworked for two sinks on one wall and for the new shower, and wiring was run for the twin vanity sconces and ceiling lighting.

Step 3

Shower framing, floor and waterproofing

The old tub alcove was framed out for a walk-in shower, the shower floor was built and sloped to the drain, and the enclosure was fully waterproofed.

Step 4

Quartz slab fabrication and install

The shower was templated and the quartz slabs and shelves were cut and fabricated in our shop, then delivered and set in place by a crew of four.

Step 5

Tile, vanity and countertop

Hexagon tile went down on the shower floor and the bathroom floor. The custom stained wood vanity was installed and the quartz countertop and undermount sinks were set on it.

Step 6

Glass, fixtures and finishes

The frameless sliding shower door was installed, faucets and shower trim were set, the mirrors and vanity lights were hung, and paint, trim and the punch list wrapped it up.

Common Questions

About a project like this

This Lake Shore bathroom landed in the $35,000–$50,000 range. That covers removing the partition wall and closing off a door, a custom-built stained wood double vanity with a quartz top and two undermount sinks, a tub-to-shower conversion with shop-fabricated quartz slab walls, hexagon tile on the shower and bathroom floors, a custom frameless sliding glass door, and new lighting, mirrors and fixtures. Bathroom remodels in the Vancouver area more broadly run from about $15,000 for a straightforward refresh to $60,000+ for a spa-level primary suite. Layout changes, custom cabinetry and slab shower walls are what move a project like this into the middle of that range.
For low maintenance, yes. A tiled shower is hundreds of tiles joined by grout, and grout is the part that stains, grows mildew and eventually needs to be resealed or redone. Quartz slabs go up as large one-piece panels, so the walls have no grout lines to clean. Quartz is also non-porous and doesn't need sealing. The trade-off is installation: the slabs have to be templated to the framed shower, fabricated in a shop, and handled carefully on site — setting the slabs in this bathroom took a crew of four.
Yes, and it is one of the most common bathroom upgrades we do. In this project the small alcove tub was removed and a walk-in shower was built in the same footprint, which kept the drain and supply lines close to where they already were. The work involves removing the tub and surround, building and sloping a new shower floor to the drain, fully waterproofing the enclosure, and then finishing the walls — here with quartz slabs — and adding a glass door. If it is the only tub in the house, it is worth thinking about whether you want to keep a tub elsewhere before you convert.
Often, yes. In this home the partition wall and its door split the bathroom into two cramped halves, each with its own vanity. Removing it opened the room into one space and, together with closing off an unused second entrance, freed up a full wall for a long double vanity. Before any wall comes out we check whether it carries structural load and whether plumbing, wiring or venting runs through it, and that determines what the removal involves.
A sliding door doesn't swing, so it needs no clearance in front of the shower. That makes it a good fit for bathrooms where the shower opens onto the same walkway as the vanity, as it does here. Frameless glass also keeps the shower walls visible from the doorway, which makes the whole bathroom feel larger, and with no bulky frame there are fewer edges for soap scum and water to collect.
A bathroom remodel that moves plumbing, adds electrical circuits or changes walls generally requires permits through the City of Vancouver or Clark County, depending on the address. Serden Group is a licensed Washington general contractor (L&I # SERDEGL826PD) and Oregon CCB # 239429, and we pull and manage the permits and inspections for you as part of the project.
Our in-house crew handles demolition, framing, the custom vanity build, quartz fabrication and slab installation, tile and finish work, and we bring in licensed, vetted trade partners for the specialized plumbing and electrical scopes. One Serden Group project manager coordinates the whole schedule, so you have a single point of accountability from the first walkthrough to the final punch list.

Want a bathroom like this in your home?

All Rights Reserved © Serden Group 2026 · Privacy Policy · Terms & Conditions

Get a Free Estimate Call Now