Project Case Study

Japandi Kitchen Remodel in Brush Prairie, WA

Brush Prairie, WA 98606 — Clark County

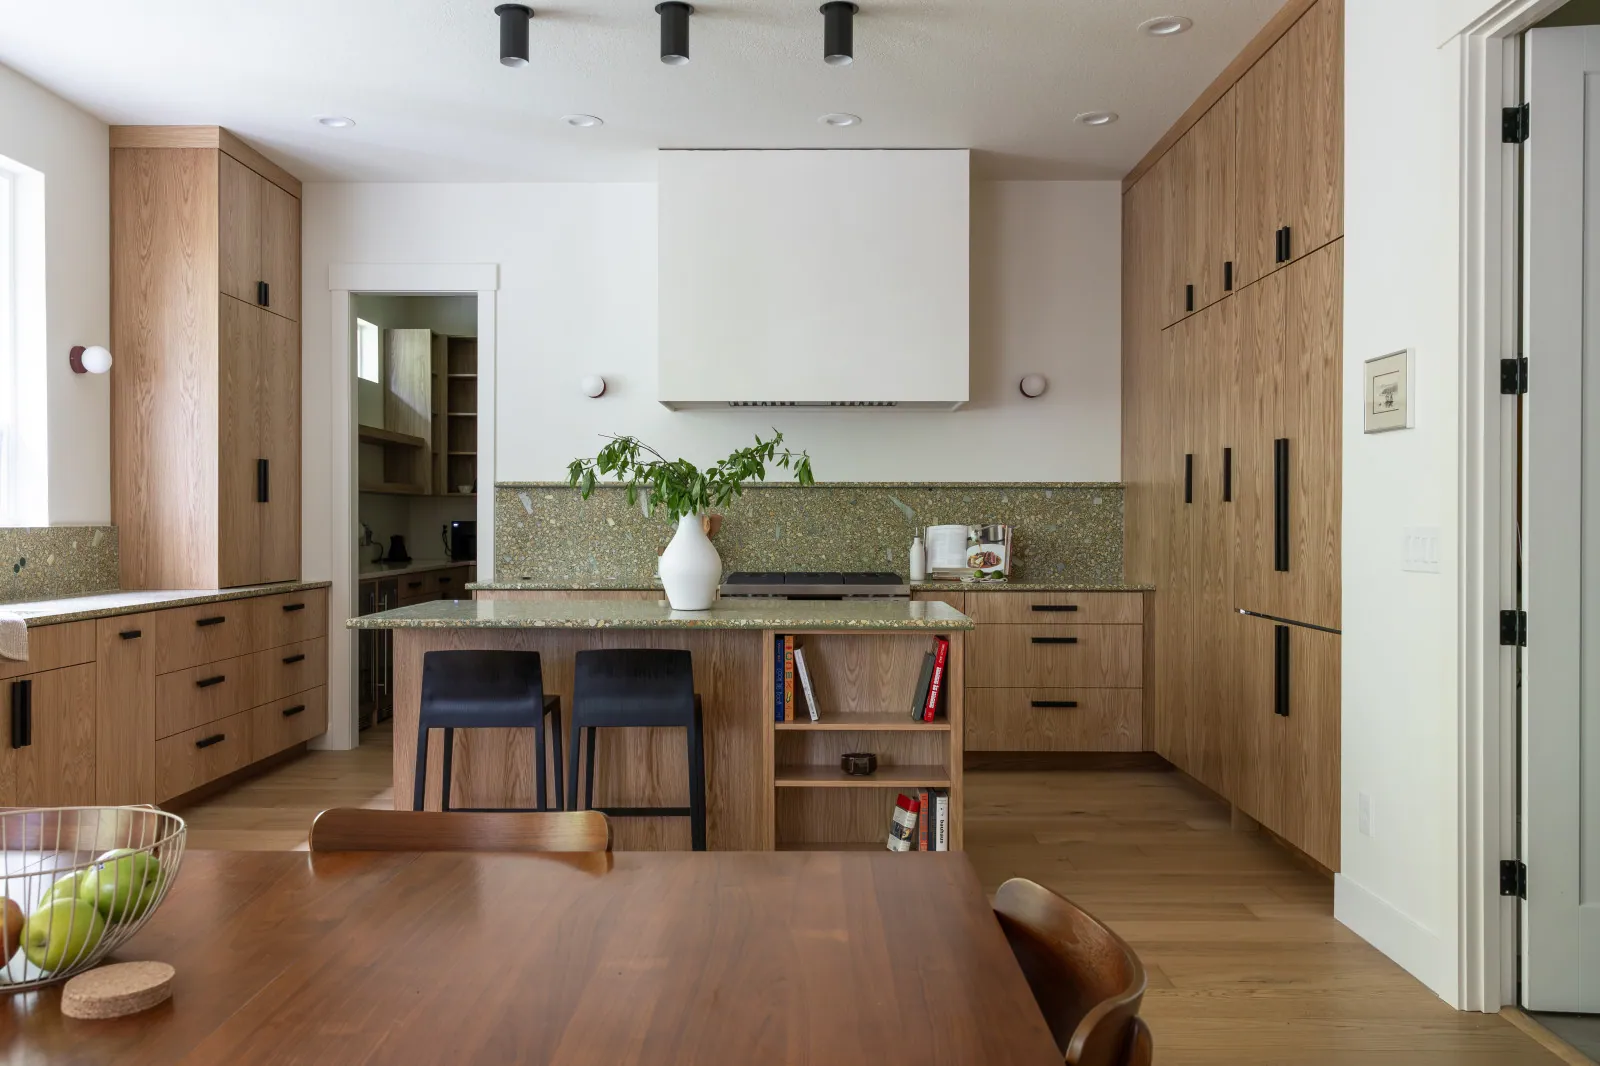
Most kitchen remodels start with a kitchen that has failed. This one did not. The homeowners had a recent, well-built, disciplined kitchen — flat fronts, full-height cabinetry, no ornament, white quartz counters — and they liked the discipline of it. What they did not like was the colour. Matte black cabinetry ran across every upper and every tall run in the room, floor to ceiling, and the room has a bank of tall windows over the sink looking straight into trees. All that daylight arrived and had almost nothing bright to bounce off. So the brief was unusually precise: keep the rules, change what the surfaces do with the light. Every run was rebuilt in plain-sliced white oak, one green terrazzo-look quartz was used for both the counters and a full-height backsplash, the dark band over the cooktop became a plaster hood finished like the wall, the refrigerator disappeared behind matching oak panels, and the walk-in pantry was rebuilt in oak with a coffee station and a wine refrigerator.
Location
Brush Prairie
WA 98606
Scope
Custom kitchen
& walk-in pantry
Cabinetry
Frameless white oak
built for the room
Investment
$110,000–$140,000
all-in
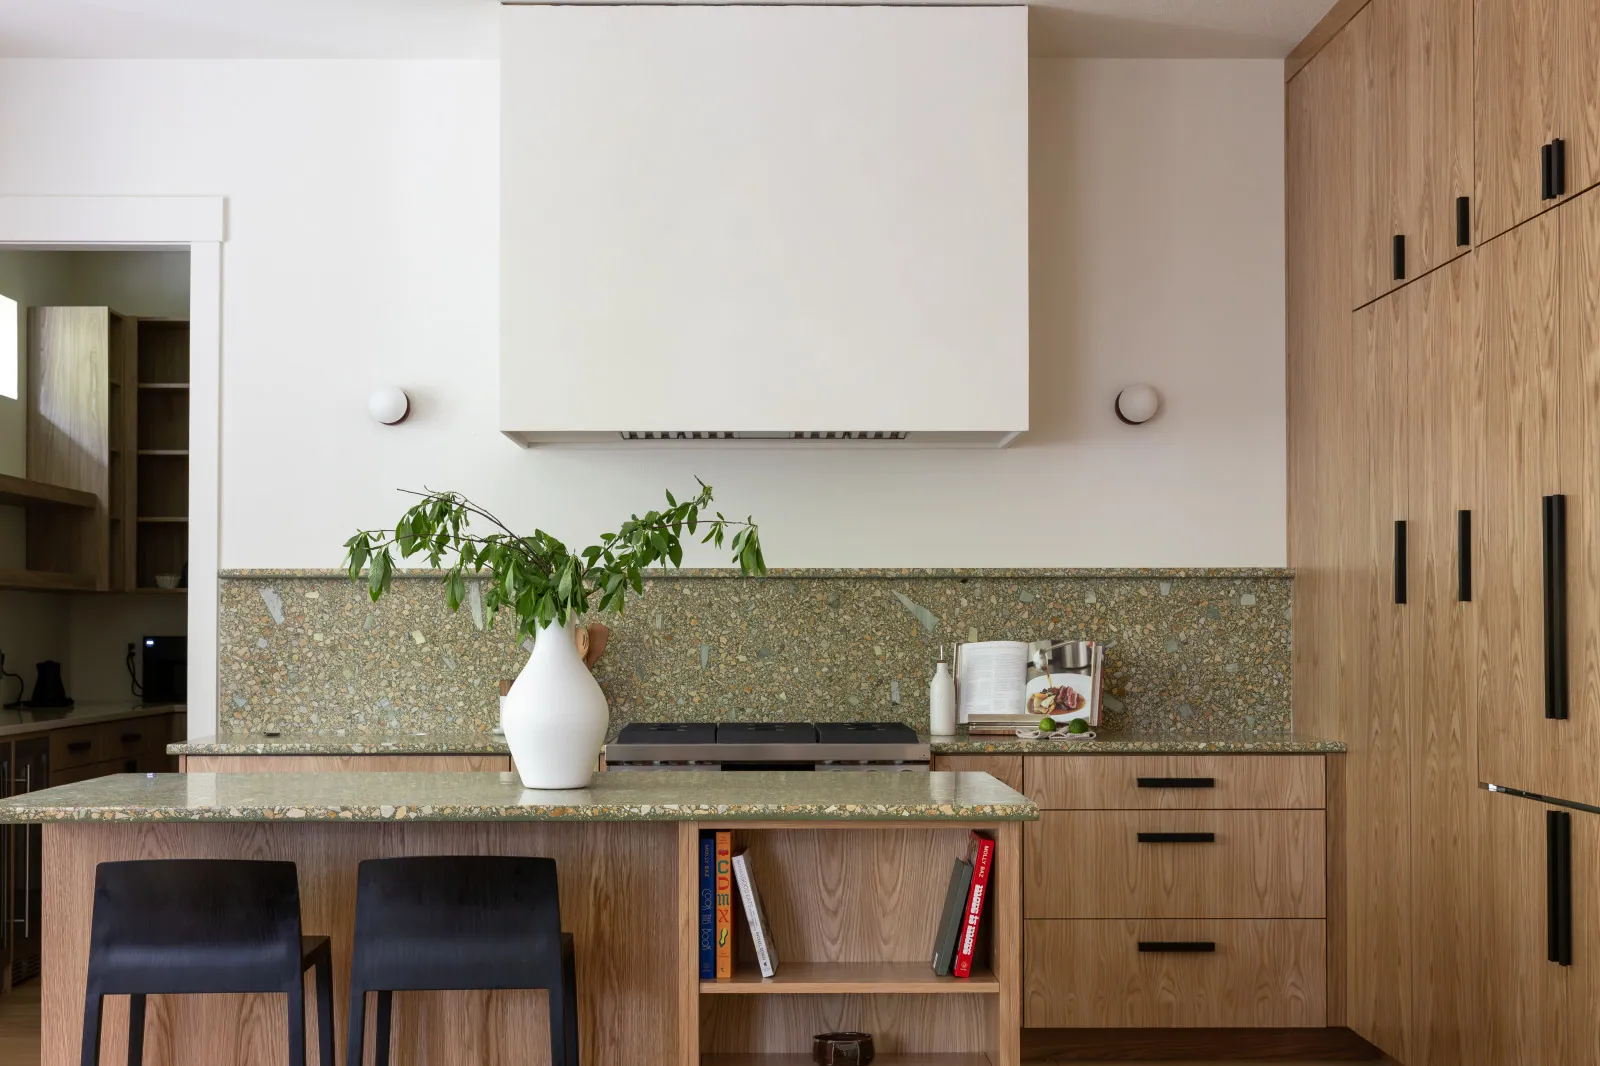
Japandi kitchen remodel in Brush Prairie, WA with plain-sliced white oak cabinetry to the ceiling, terrazzo-look quartz counters and backsplash, a plaster hood and an oak island
The finished kitchen: white oak on every run, one stone from counter to upper cabinet, and a plaster hood finished like the wall behind it.
The Starting Point

A good kitchen that was simply too dark

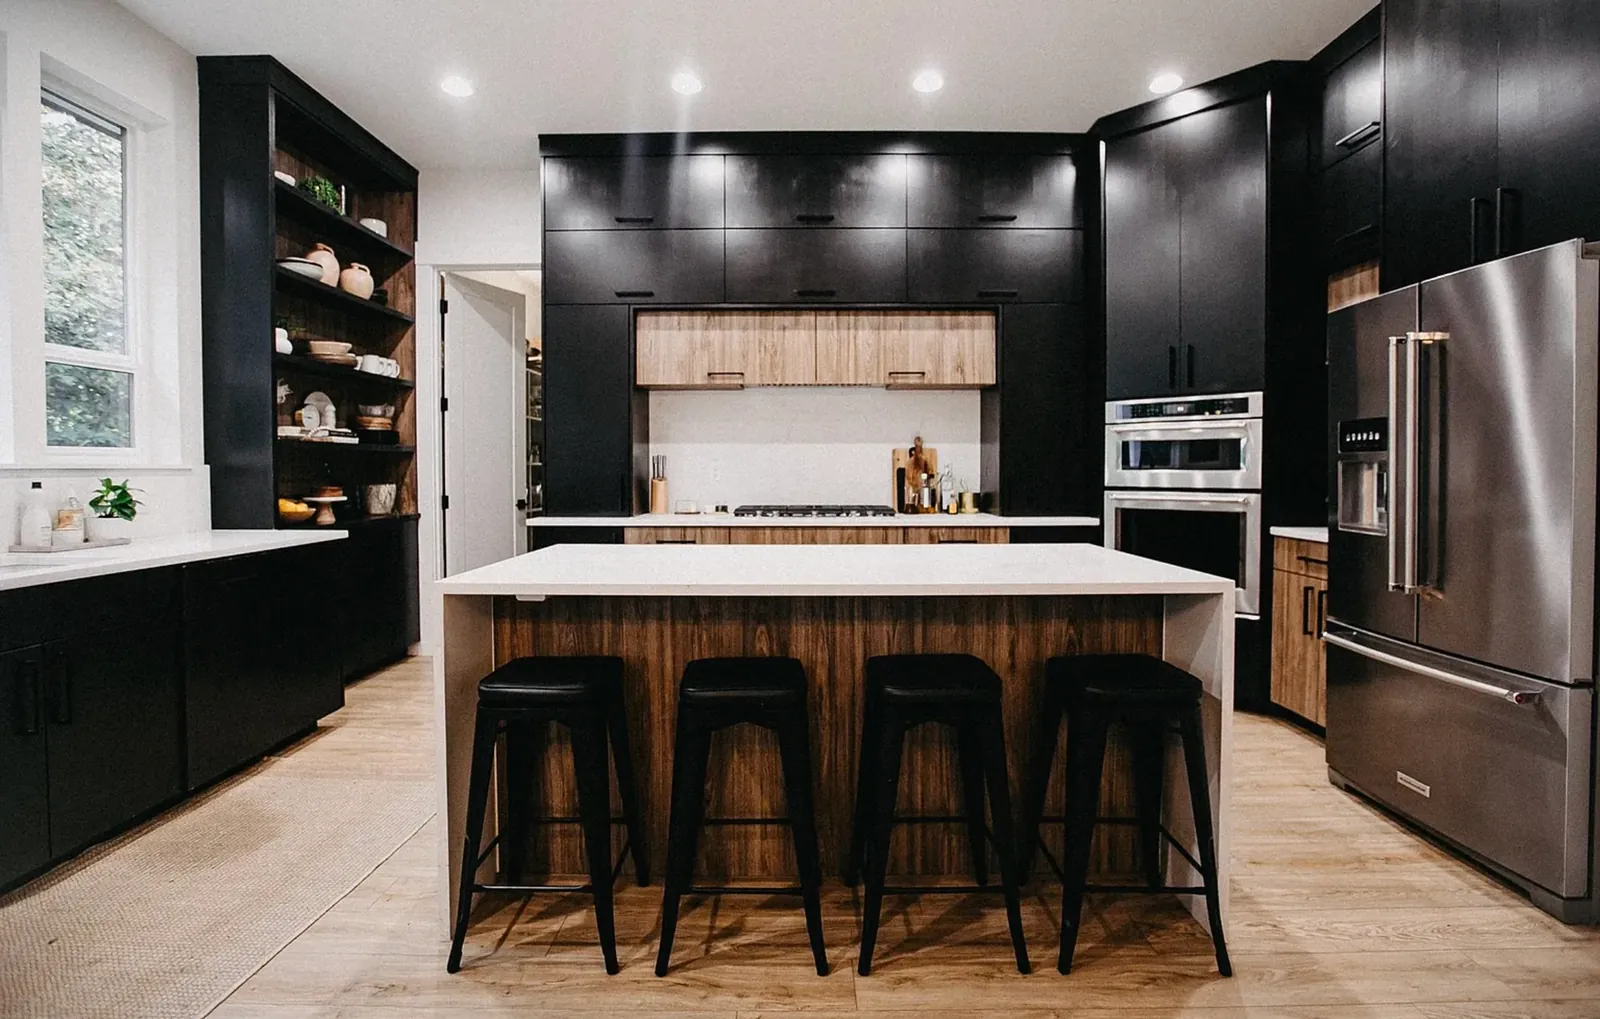
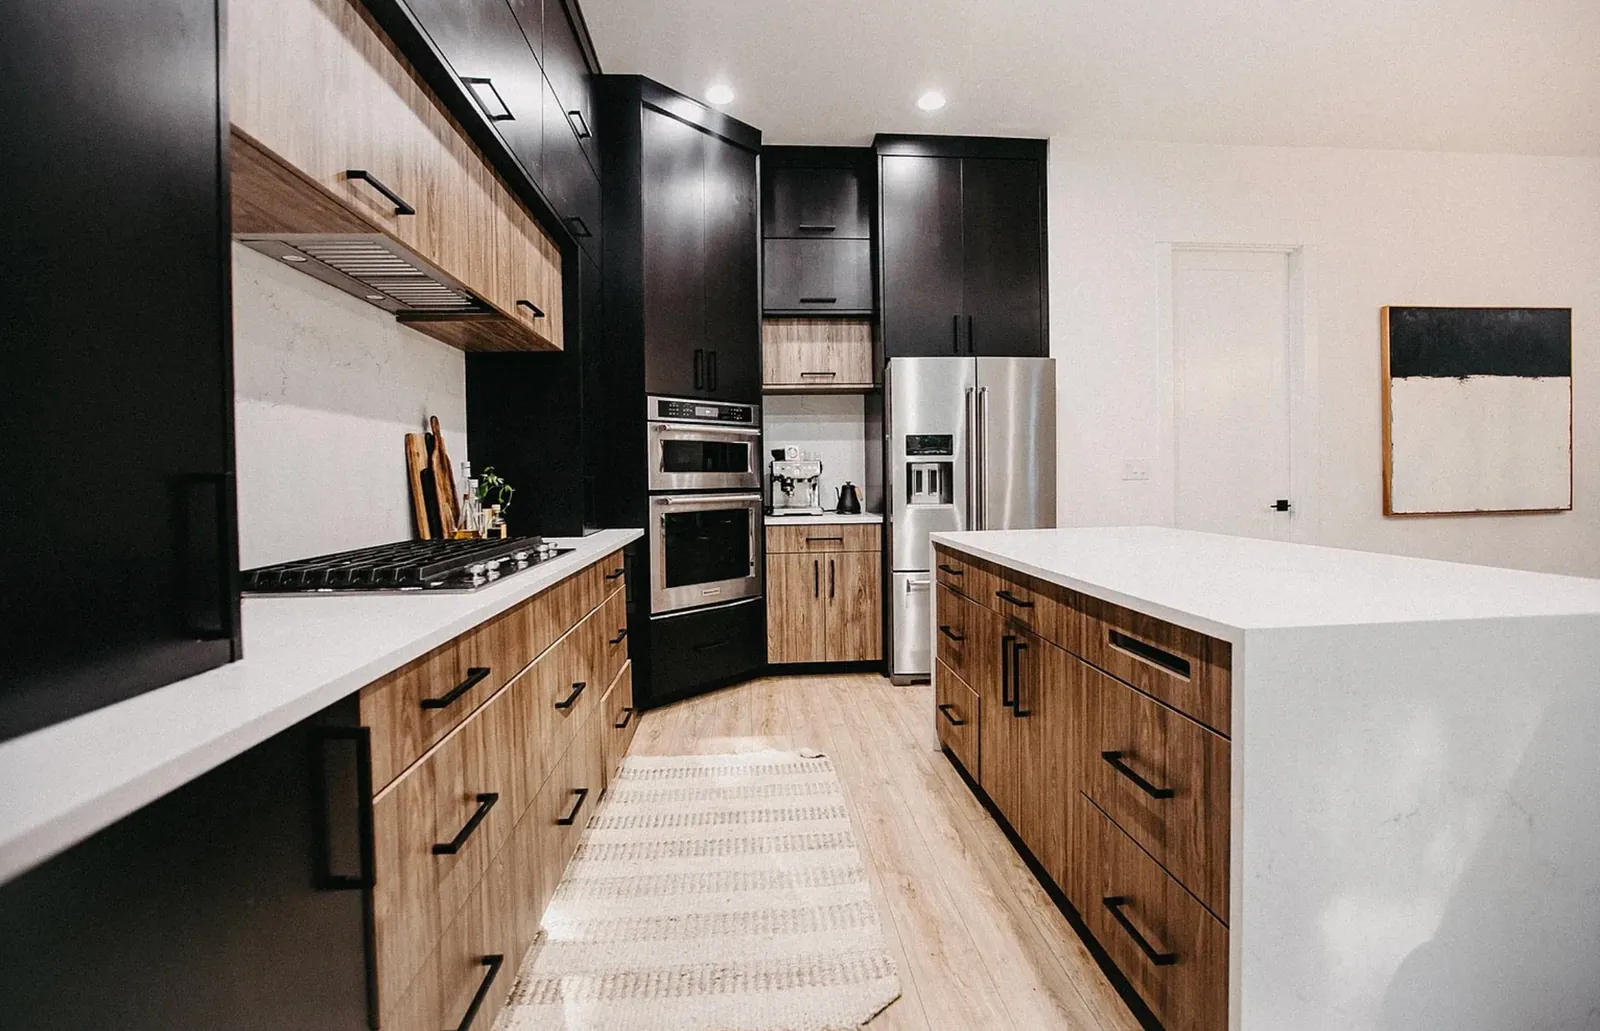
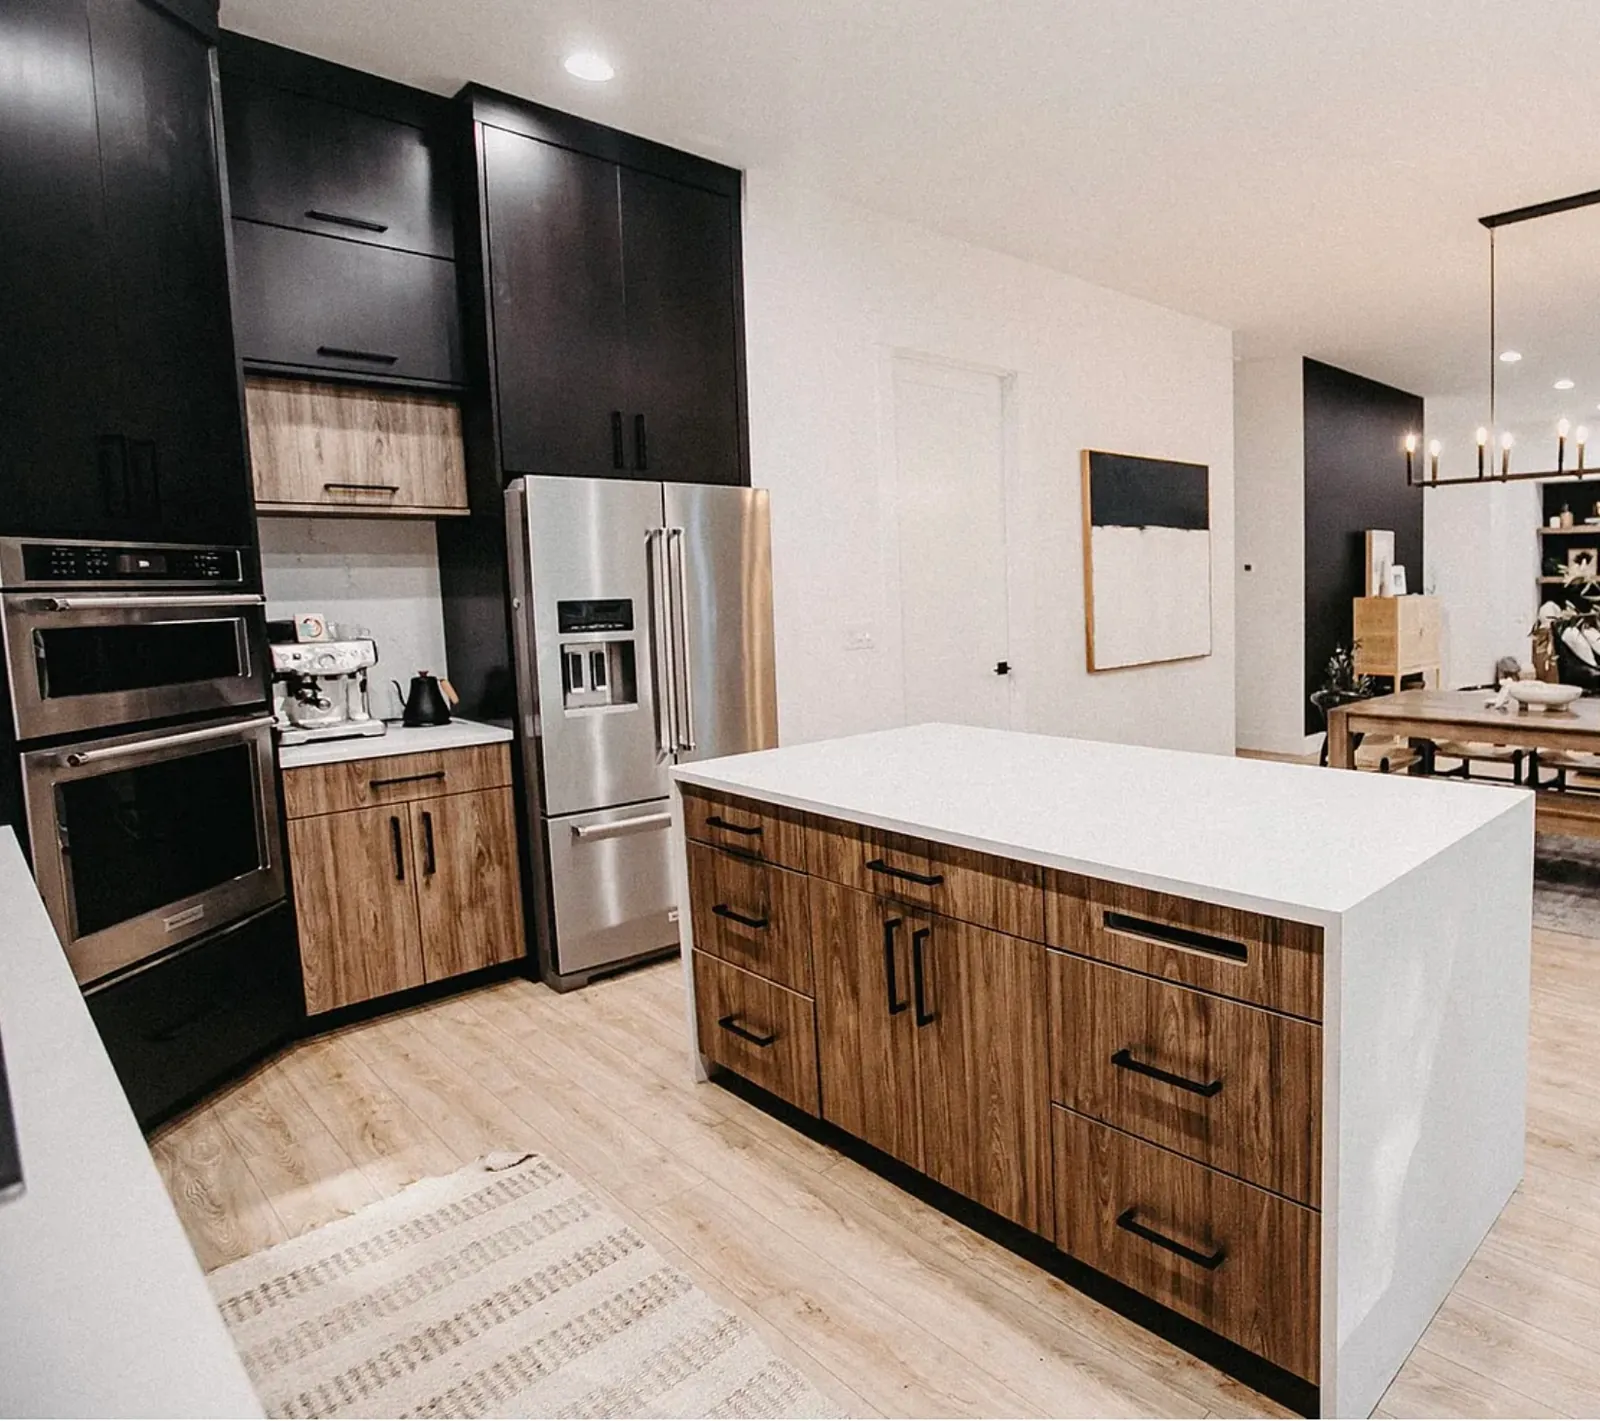
It is worth being clear about what was wrong here, because it was not the usual list. The cabinetry was not failing. The layout was broadly sensible. Nothing was yellowed, chipped or thirty years old, and the counters were white quartz. The homeowners’ own photos of the original kitchen show a genuinely handsome modern room: flat-front matte black cabinetry running to the ceiling, black uppers across the whole cooking wall, a black open-shelving unit at the end of the sink run, medium-brown wood drawer banks below, and a wood-panelled island under a white waterfall quartz top.

And it was dark. Not dim from a lack of fixtures — the ceiling is full of recessed cans — but dark in the way a room is when its largest surfaces absorb light instead of passing it on. The tall windows over the sink face into trees, which is the best and softest daylight in the house. Black uppers on the cooking wall, black on the tall appliance tower and black base cabinets under the windows meant that light landed and stopped. The one open shelving unit, which should have relieved the mass, instead read as a dark recess because its interior sat in shadow. Exposed stainless — a French-door refrigerator and a stack of wall ovens — cut the tall run into pieces, which is exactly what full-height cabinetry is supposed to avoid.

So this was a palette problem wearing the costume of a remodel. The homeowners were not abandoning the style — they wanted the same flat, quiet, full-height cabinetry, the same absence of ornament, the same clear counters. They wanted it in oak.

All five of the homeowners’ before photos are paired with the finished room below, and every one of them is in the gallery further down the page.
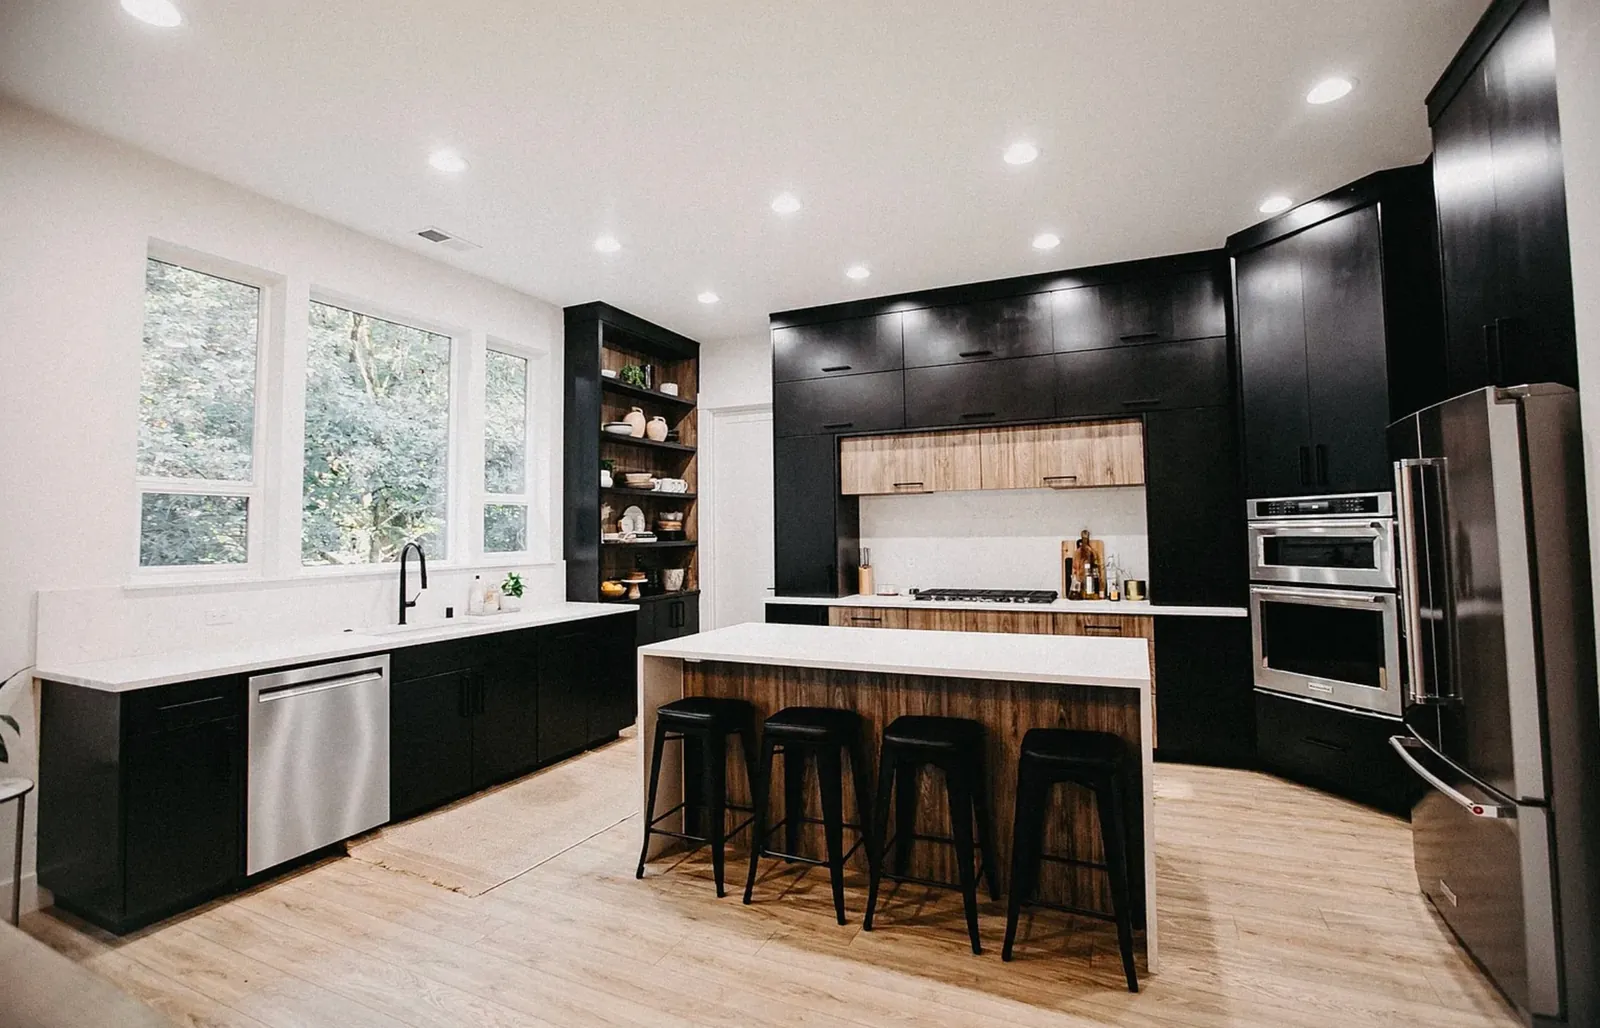
The Brush Prairie kitchen before remodeling, seen from the dining end: matte black cabinetry to the ceiling, black base cabinets under the windows, a black open-shelving unit and a wood-panelled island
Before Black across every upper and every tall run
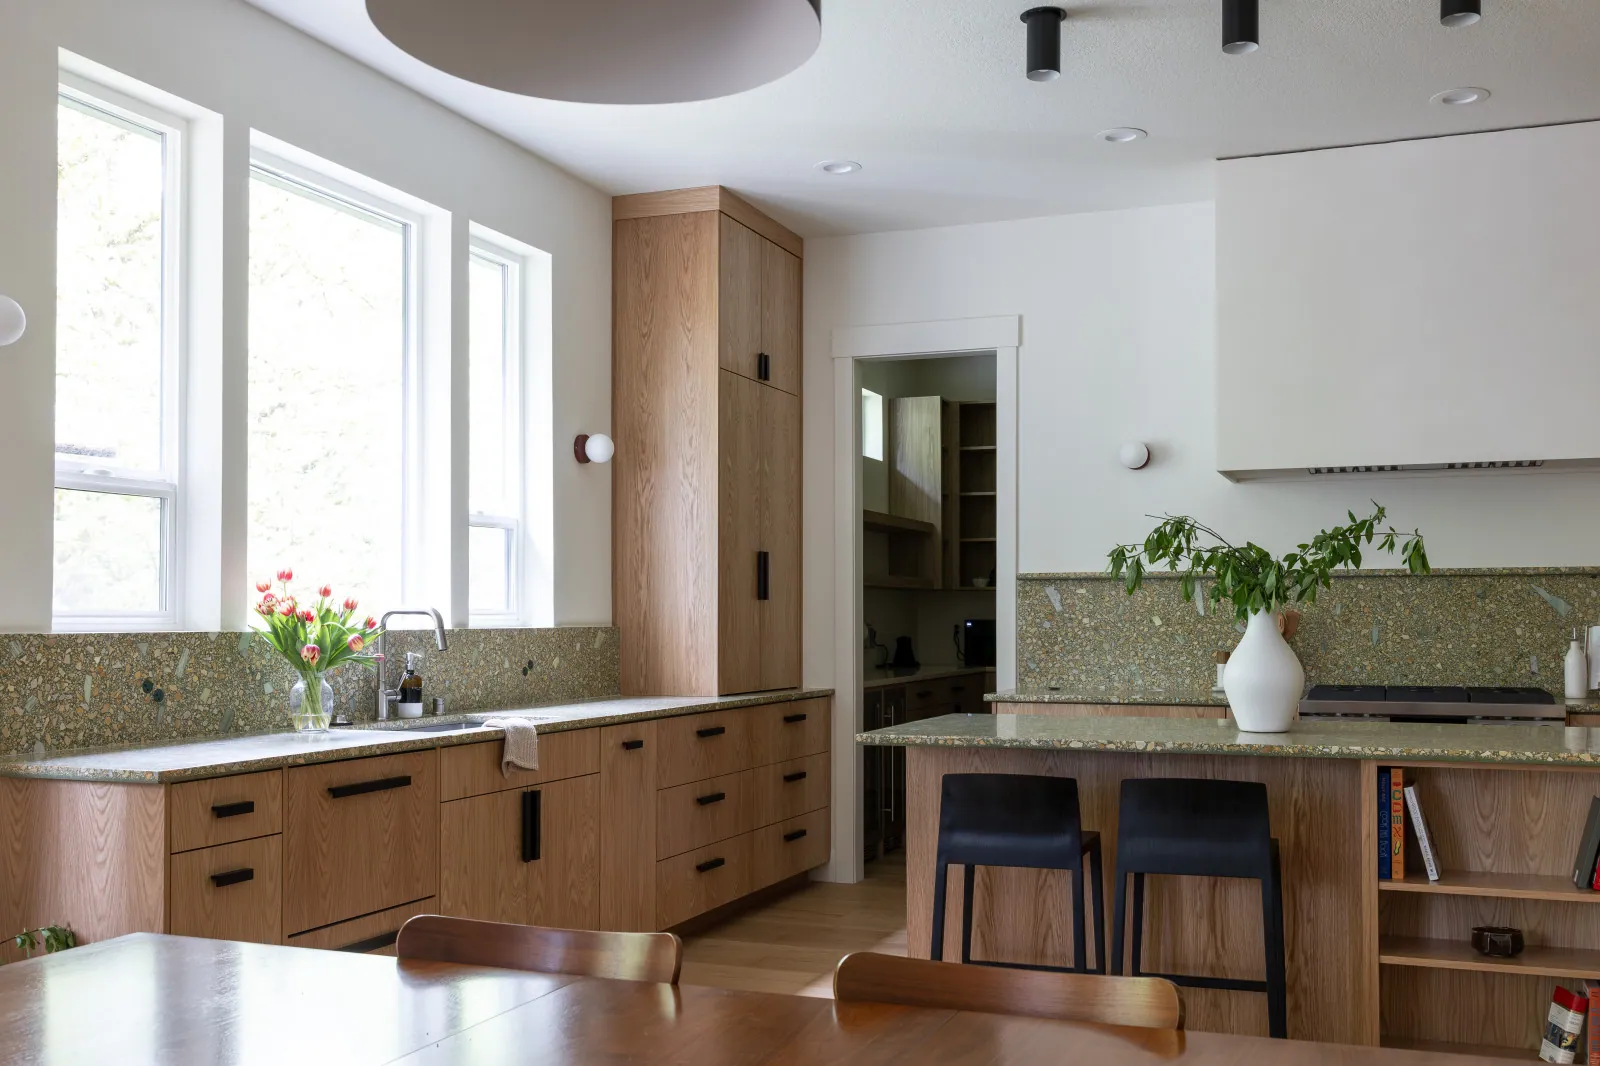
The same room after remodeling, with plain-sliced white oak cabinetry to the ceiling, terrazzo-look quartz counters and backsplash, a plaster hood and the walk-in pantry doorway beyond
After The same room and the same discipline, in white oak
The original cooking wall head-on before remodeling, with black upper cabinets, a dark band above the cooktop and a wood-panelled island with a white quartz top
Before A dark band above the cooktop, and no real hood
The same cooking wall after remodeling, with a plaster hood finished like the wall, terrazzo-look quartz counters and a full-height backsplash in the same stone
After A plaster hood that recedes, and one stone from counter to cabinet
The original appliance wall before remodeling: a stainless oven stack and an exposed stainless French-door refrigerator breaking up the black cabinetry, with wood drawer banks and white quartz counters
Before Exposed stainless cutting the tall run into pieces
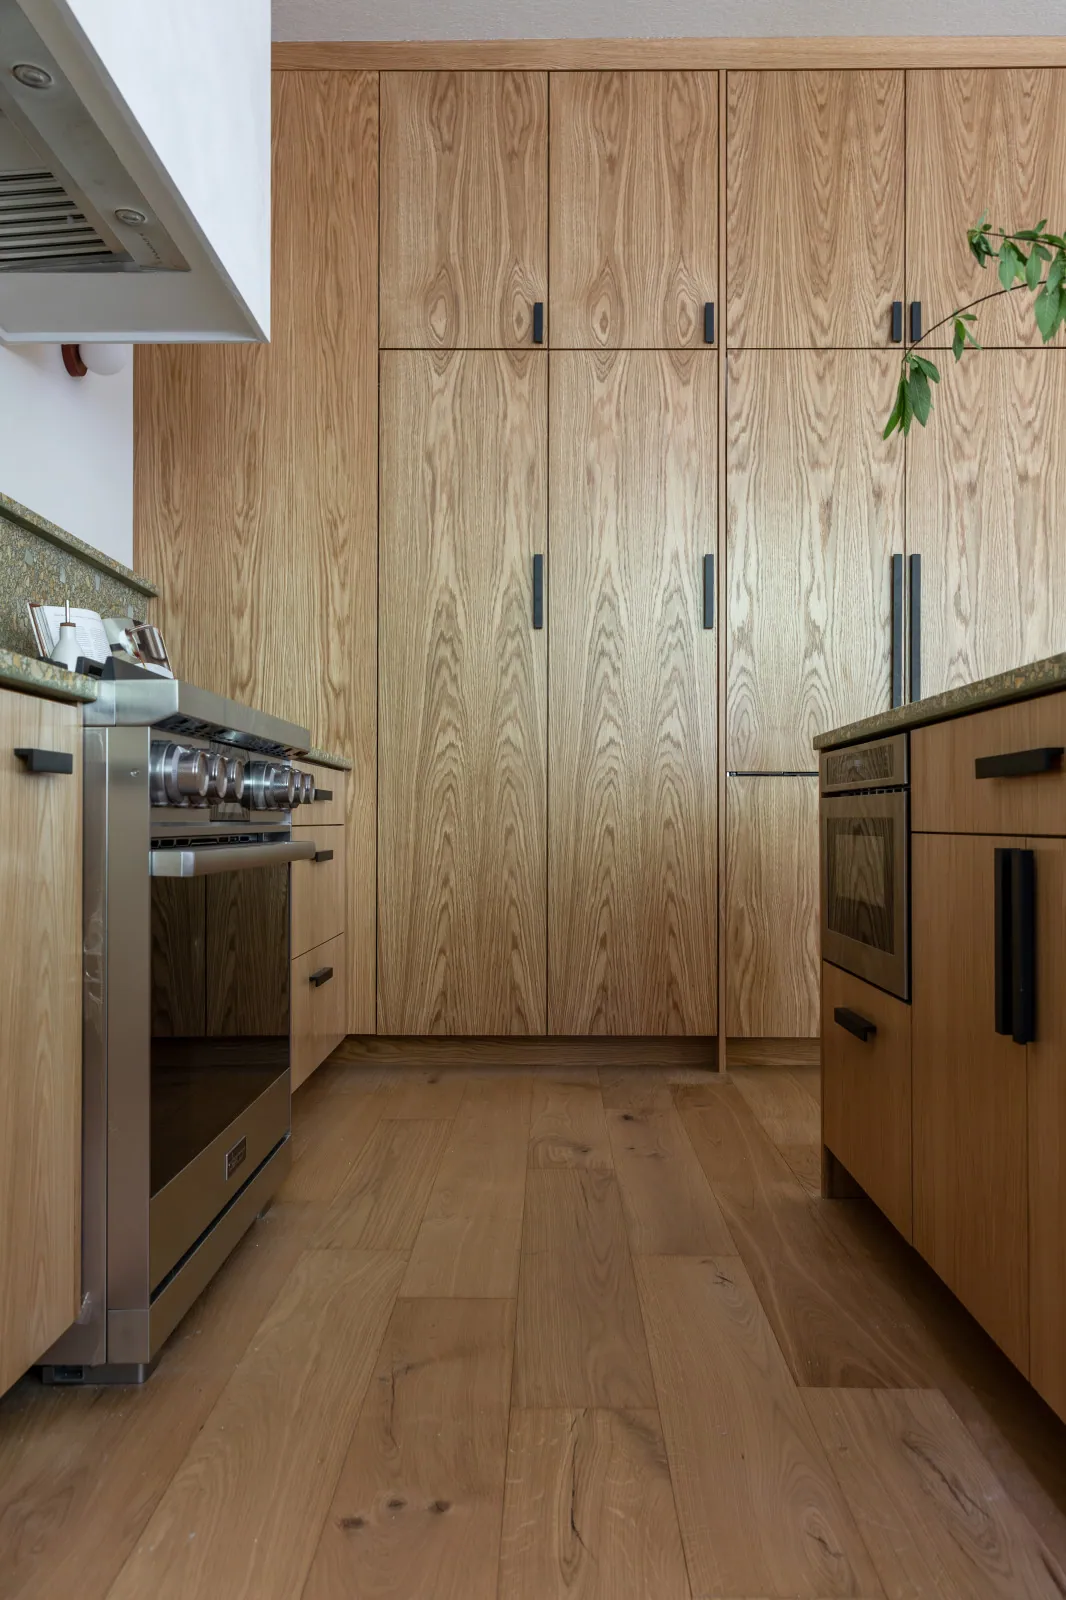
The same wall after remodeling: floor-to-ceiling plain-sliced white oak with the refrigerator hidden behind matching panels, the oven built into oak-fronted cabinetry and the stainless range left as the one visible appliance
After One wall of oak, with the refrigerator inside it
The original island and oven stack before remodeling, looking through to the dining room past a black accent wall
Before Looking through to the dining room past a black accent wall
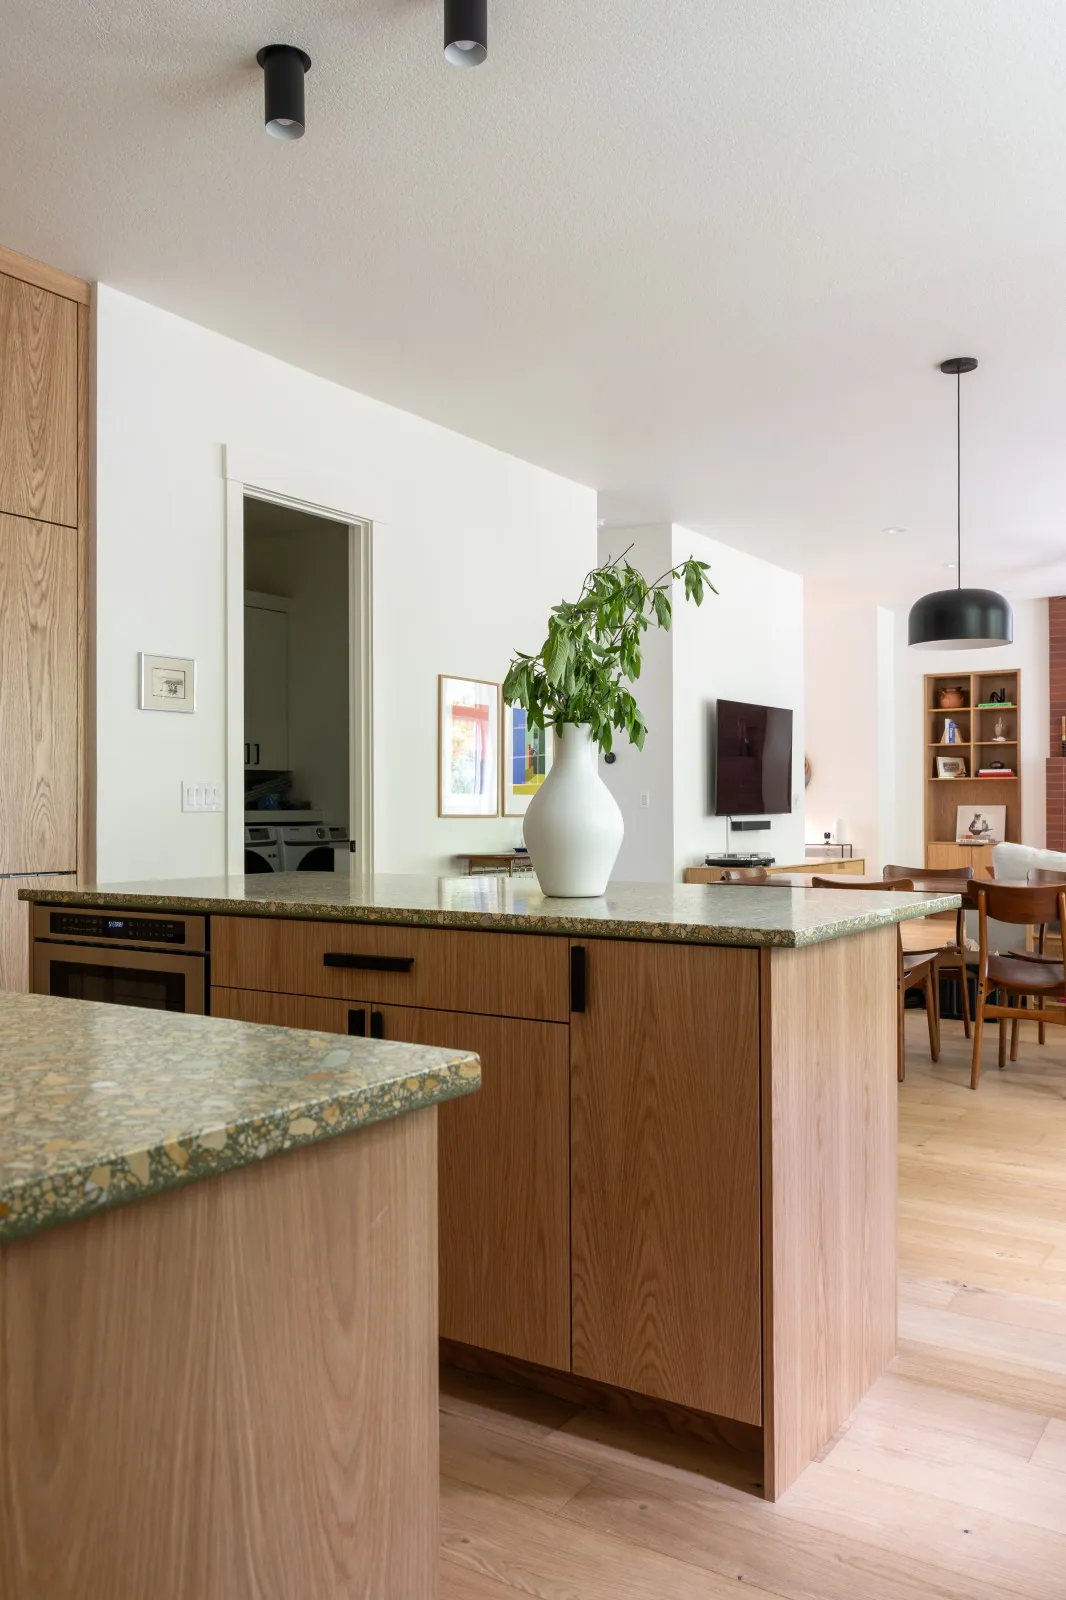
The finished oak island with its terrazzo-look quartz top, looking through the same opening to the living room beyond
After The same opening, with the oak island carried through it
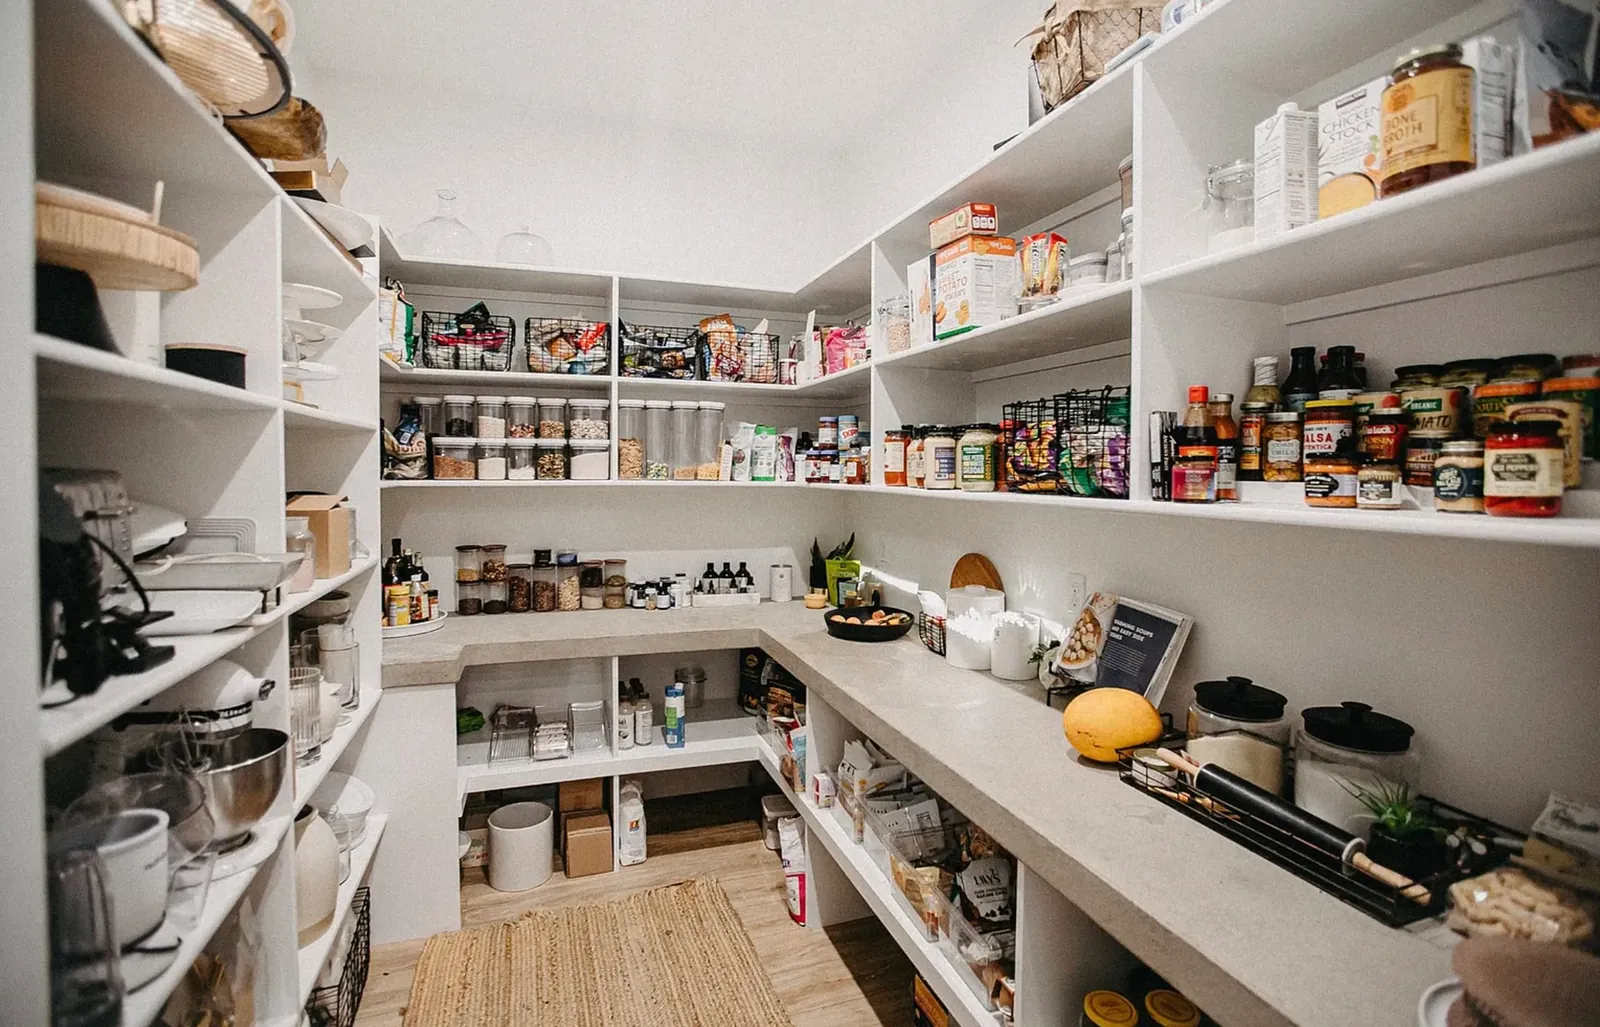
The original walk-in pantry before remodeling, fitted out with plain white open shelving over a white counter
Before A proper walk-in room let down by its fittings
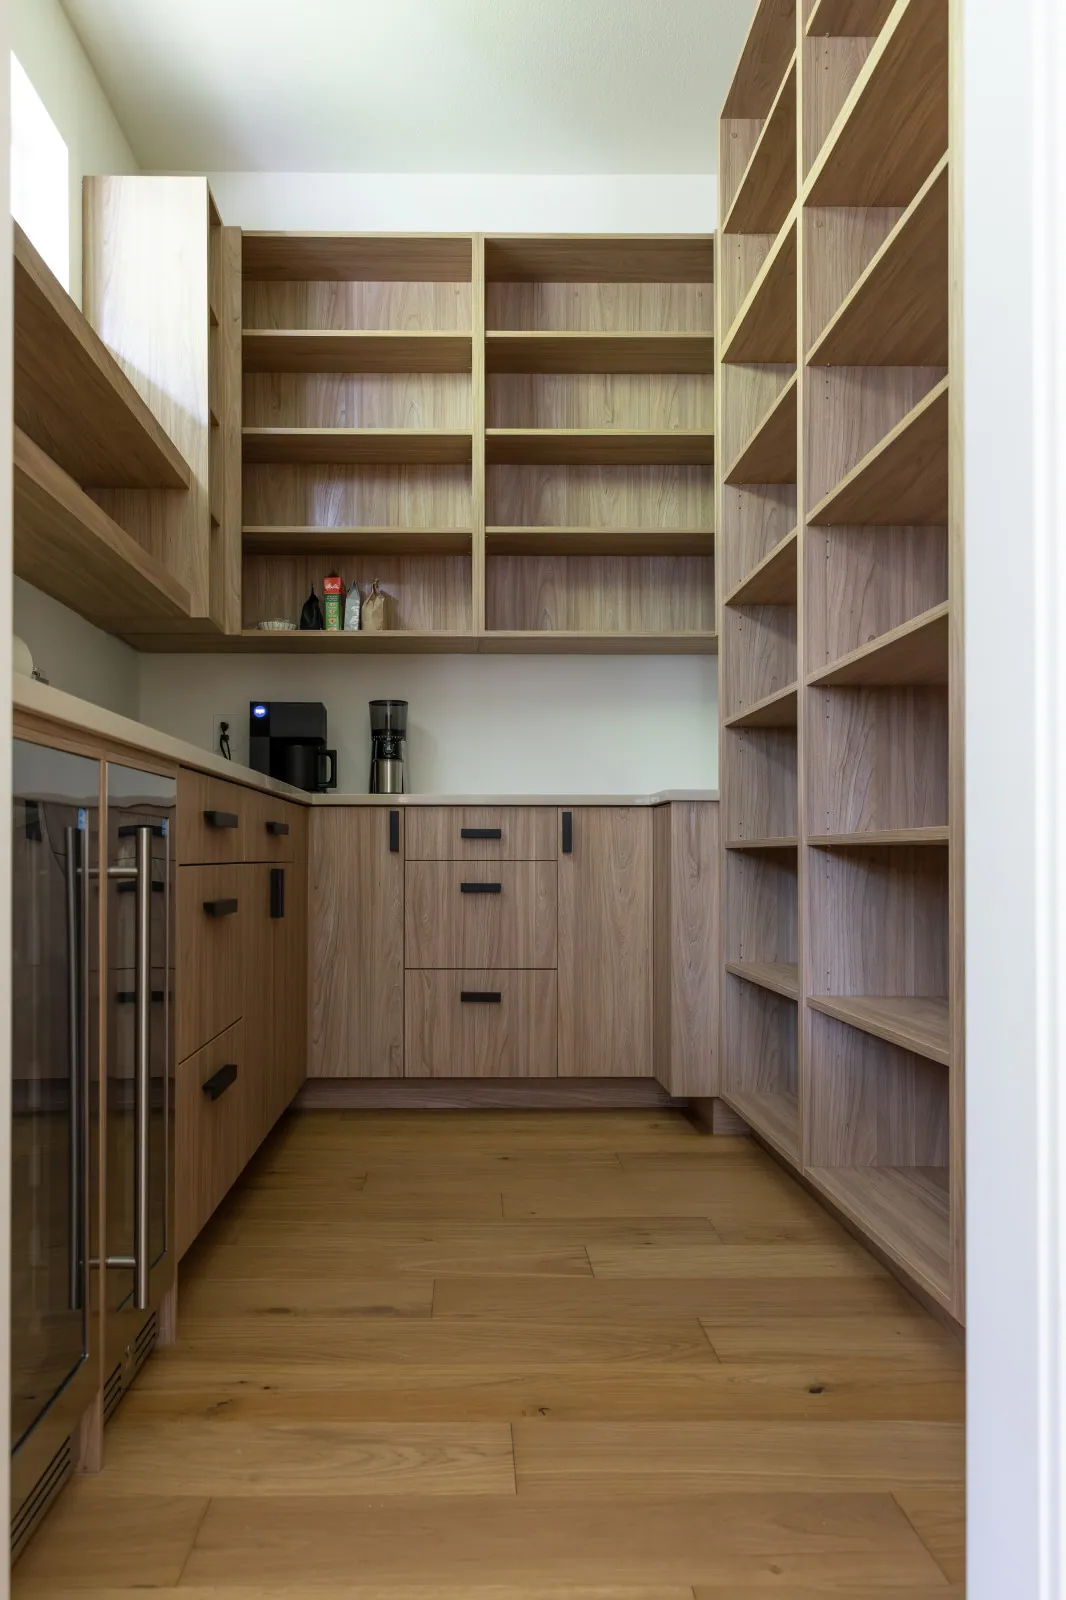
The rebuilt walk-in pantry after remodeling, with custom white oak open shelving on two walls, a counter used as a coffee station and a glass-front wine refrigerator
After Rebuilt in oak, with a coffee station and a wine refrigerator
Design & Construction Solution

Same rules, different palette

When the style is staying and only the palette is changing, the design work is not about invention — it is about knowing which surfaces actually control how bright a room feels and spending the budget there, in the right order. Cabinetry first, because it is the largest surface in any kitchen by a wide margin. Then the wall between counter and upper cabinet, which sits at eye level. Then the hood, which is the biggest single object at head height. Then the appliances, which is where a minimal kitchen usually gives itself away.

01

Rebuild every run in plain-sliced white oak

Every cabinet in the room is new, frameless, with flat doors and drawer fronts in stain-grade plain-sliced white oak, stained and clear-coated in the shop rather than on site. Plain-sliced was specified deliberately: it gives the long, straight, cathedral grain that stays calm across a wide flat front, where a busier veneer would read restless. The doors were drawn with vertical grain and finished as a set, so the colour runs consistently from the sink wall to the tall appliance run. This one change is the reason the room reads completely differently in exactly the same daylight.

02

Take one stone from the counter all the way up the wall

The homeowners chose the countertop material themselves — a green terrazzo-look quartz with a heavy aggregate of green, gold and cream chips — and it is used for the counters, the island top and a full-height backsplash that runs from the counter to the underside of the cabinets. One material for both means no grout lines and no transition at eye level, which is where a dark or patterned backsplash would otherwise eat the light. Even the outlets are cut straight into the stone. Because the quartz carries all of the room’s pattern, the cabinetry is free to stay completely plain.

03

Replace the dark band over the cooktop with a real plaster hood

The original kitchen had a heavy dark band of cabinetry above the cooktop and no proper hood. In its place is a custom hood surround finished like the wall it sits against, with a stainless liner tucked up inside it doing the actual ventilation. A hood is unavoidable in a kitchen that cooks; making it read as architecture rather than as furniture is the next best thing to not having one. It is also the element that most clearly marks this as a Japandi room rather than a contemporary one.

04

Hide the refrigerator, and keep exactly one stainless statement

The tall run opposite the cooking wall is continuous oak from floor to ceiling, and the refrigerator is inside it: panel-ready surrounds and full-height door panels in the same plain-sliced oak as everything else, with long black pulls as the only clue. The wall oven went into oak-fronted cabinetry for the same reason. What stayed visible is the pro-style stainless gas range, and that is deliberate — when everything else in a kitchen is one material, one honest piece of equipment reads as intent rather than as clutter. In the original room, stainless was doing the opposite job: three separate appliances chopping one wall into three.

05

Close the dark open shelving and square off the sink run

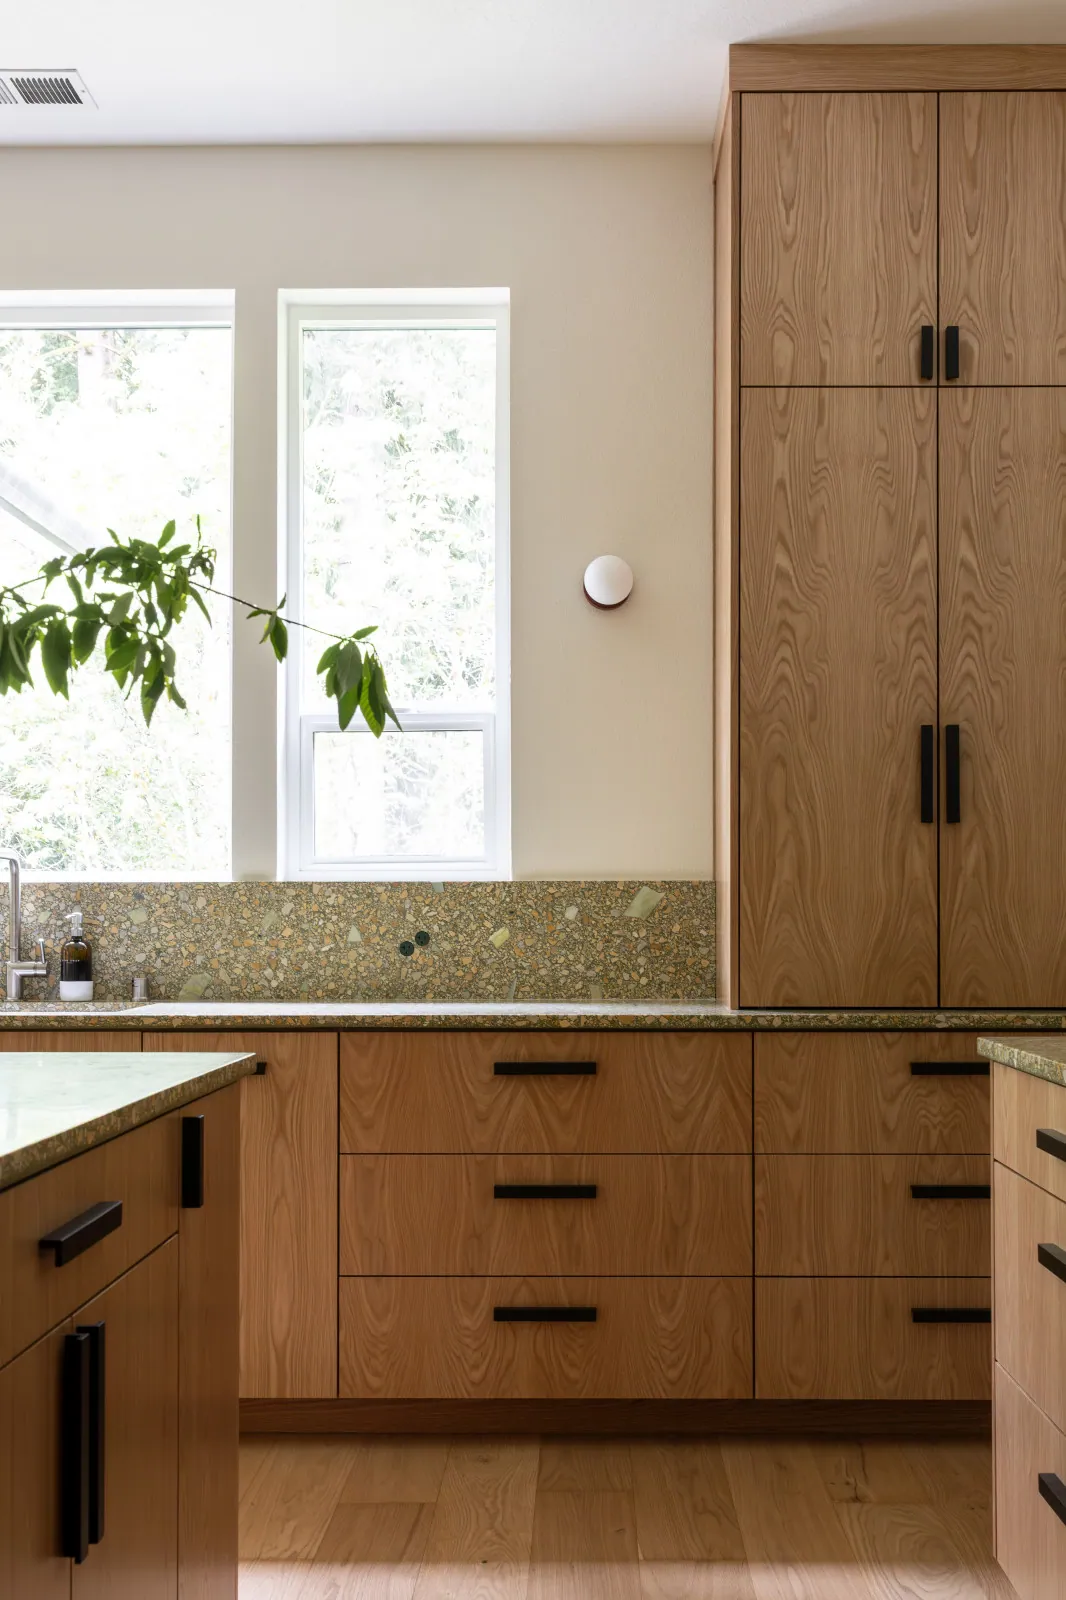
Open shelving only works when its interior is as bright as the room. Here it was a shadowed black recess, so it was replaced with a full-height oak cabinet that squares off the end of the sink run and adds enclosed storage exactly where the old unit was losing it. The display shelving moved to the end of the island instead, where it is lit from two sides, holds the cookbooks and reads as an intentional gap rather than a dark hole.

06

Adjust the layout — including moving an interior door

The plan was largely sound but not untouched: framing was altered to suit the new cabinet runs and an interior door was relocated, so circulation stopped cutting across the work zone and the new full-height runs had uninterrupted wall to land on. In a kitchen where every run has to read as continuous joinery, uninterrupted wall is the scarce resource, and moving a door is a small line item that buys a lot of it.

07

Rebuild the walk-in pantry to the standard of the kitchen

The original pantry was a proper walk-in room let down by its fittings — plain white shelving over a white counter. It was rebuilt with custom white oak shelving running floor to ceiling on two walls, oak base cabinets, a counter that works as a coffee station, and a glass-front wine refrigerator, all lit by a clerestory window. Clear counters in the kitchen are a storage outcome rather than a habit, and the pantry is where that outcome is bought.

08

Engineer the interiors so the minimalism survives daily use

Plywood box upgrades, white melamine interiors, soft-close slides and hinges throughout, and a set of pull-outs doing specific jobs: a garbage pull-out, a spice pull-out, a utensil bin base organiser and a pocket-door system for the appliance cabinet. Every one of those exists so that something which would otherwise sit on a counter has an assigned place behind a flat front.

Scope of Work

Everything that changed

The kitchen was stripped back and rebuilt. Our in-house crew handled design, demolition, framing, cabinet installation and finish carpentry, with licensed, vetted trade partners on the plumbing and electrical scopes and on the stone fabrication. One Serden Group project manager ran the schedule, the cabinet shop coordination and the inspections from the first walkthrough to the final punch list.
  • Design and full cabinet shop drawings for the kitchen and pantry
  • Demolition and preparation of the existing kitchen
  • Framing altered as needed to suit the new kitchen layout
  • Interior door relocated to open up the new cabinet runs
  • Electrical reworked to support the new kitchen configuration
  • Plumbing reworked to support the new kitchen configuration
  • Drywall and sheetrock repairs to match existing finishes
  • Custom frameless kitchen cabinetry in stain-grade plain-sliced white oak
  • Flat doors and drawer fronts throughout, drawn with vertical grain
  • Custom walk-in pantry cabinetry and open shelving
  • Plywood cabinet box upgrades with white melamine interiors
  • Custom hood surround, finished to read as part of the wall
  • Panel-ready refrigerator surrounds and door panels in matching oak
  • Garbage, spice and utensil pull-outs plus a pocket-door system
  • Soft-close drawer slides and soft-close hinges throughout
  • One-piece crown moulding at the top of the full-height runs
  • Cabinets stained, clear-coated and painted in the shop, not on site
  • Quartz counters templated, fabricated and installed (homeowner-supplied material)
  • Full-height quartz backsplash in the same material as the counters
  • Undermount sink set and faucet reconnected
  • Cabinet delivery, load-in, installation and alignment
  • Debris haul-away, final cleanup, punch list and walkthrough
The tall plain-sliced white oak cabinet that replaced the original black open-shelving unit at the end of the sink run, with the terrazzo-look quartz counter and full-height backsplash alongside
Materials & Products Installed

What went into the kitchen

A Japandi kitchen is defined by what is missing from the specification as much as by what is in it. There is one cabinet species in this room, one stone doing two jobs, and one hardware finish — and that is very nearly the entire list.

Cabinet construction
Frameless, built for this room rather than assembled from stock boxes, with flat doors and drawer fronts throughout. No face frames means the fronts sit nearly edge to edge, which is what turns a run of cabinets into a single flat plane — and what allows the refrigerator to vanish into it.
Cabinet fronts
Stain-grade plain-sliced white oak, drawn with vertical grain, stained and clear-coated in the shop. Plain slicing gives the long straight grain that stays calm across a wide flat front; shop finishing keeps the colour even from the sink wall to the tall run, which is not achievable with an on-site finish.
Cabinet boxes
Plywood box upgrades with white melamine interiors. The white interior is not incidental — a light interior is what stops a deep cabinet reading as a dark cavity every time it is opened.
Counters
A green terrazzo-look quartz with a heavy aggregate of green, gold and cream chips, selected by the homeowners and templated off the installed cabinets. Quartz is non-porous, so it needs no sealing and does not stain from oil, wine or citrus. Here it also carries all of the room’s pattern, which is what licenses the cabinetry to stay completely plain.
Backsplash
The same quartz, run full height from counter to cabinet, with the outlets cut directly into the stone. One material, no grout lines, no transition at eye level — and a surface that wipes down in a single pass behind the range.
Hood
A custom hood surround finished to match the wall rather than the cabinetry, with a stainless liner inside it, so the largest object at head height reads as architecture and recedes. This replaced a heavy dark band of cabinetry that dominated the original room.
Appliance integration
Panel-ready refrigerator surrounds and full-height door panels in the same plain-sliced oak, the wall oven set into oak-fronted cabinetry, and a pocket-door system for the appliance cabinet. The pro-style stainless gas range is the one appliance left deliberately visible.
Cabinet interiors
Soft-close slides and hinges throughout, with a garbage pull-out, a spice pull-out and a utensil bin base organiser. Minimalism only holds if every displaced item has an assigned home.
Walk-in pantry
Rebuilt with custom white oak open shelving floor to ceiling on two walls, oak base cabinets, a counter used as a coffee station and a glass-front wine refrigerator, lit by a clerestory window — in place of the original plain white shelving.
Hardware
Long matte black bar pulls, one finish across the whole kitchen — the only element carried over from the original palette, and the only ornament on a flat front. Length and placement were drawn rather than left to the installer.
Project Sequence

How a custom kitchen actually runs

On a fully custom kitchen the cabinet shop, not the construction crew, sets the calendar. Every box in this room was built for its own opening, so design and shop drawings had to be finished and signed off before demolition — and the shop time runs alongside the early site work rather than after it. The on-site order below is not a preference; it is dictated by inspections and by the fact that stone can only be templated off cabinets that are already installed and levelled.

Stage 1

Design, cabinet drawings and sign-off

Layout adjustments, then full shop drawings for every kitchen and pantry cabinet: frameless construction, flat fronts, vertical grain direction, plain-sliced white oak faces, white melamine interiors, and each pull-out and appliance surround located to the inch. Nothing gets cut until this is approved, because a frameless run cannot be adjusted on site.

Stage 2

Permits, demolition and framing

Clark County permits pulled, then the kitchen stripped out. Framing altered for the new layout and the interior door relocated. With the room open, the plan is set out and every cabinet opening verified against the approved drawings.

Stage 3

Plumbing, electrical and rough inspection

Plumbing and electrical reworked for the new configuration — sink and dishwasher, the range, the hood, the panel-clad refrigerator run and circuits for the pantry and its wine refrigerator. Rough inspections signed off before anything is closed up.

Stage 4

Drywall, paint and shop build

Sheetrock patched and finished to match the existing surfaces, then primed and painted. This is the quiet stretch on site and the busy one in the shop, where the oak is being stained and clear-coated and the hood surround is being built.

Stage 5

Cabinet delivery and installation

Cabinets delivered, loaded in and set: scribed, levelled, fastened and aligned so the gaps between flat fronts stay consistent across every run. The hood surround, the refrigerator panels and the pantry cabinetry go in at the same time.

Stage 6

Counter template, fabrication and install

Counters templated off the installed cabinets — which is why this cannot happen any earlier — then fabricated along with the full-height backsplash pieces, delivered and set. Undermount sink fitted and the faucet reconnected.

Stage 7

Hardware, trim-out, appliances and walkthrough

Outlet caps reinstalled in the stone, hardware fitted, and appliances installed and commissioned. Final inspection, debris haul-away, cleanup, punch list and a walkthrough — plus the return visits for adjustments once the kitchen has been lived in.

“We were worried we wouldn’t be able to find anyone who could deliver on the vision we had for our new kitchen. Thankfully, once we got going with Serden Group LLC, we quickly realized the contractor and cabinet maker had listened intently to what we wanted and came up with a design we loved. The install was quick and everyone communicated in a timely manner. Once we were finished, we even had the guys come back several times for adjustments. Overall, the experience was exceptional. Would absolutely recommend to everyone.”

Jennifer S.

Google review — Brush Prairie, WA

Common Questions

About a project like this

Japandi is Japanese minimalism crossed with Scandinavian warmth, and in a kitchen it comes down to three rules. Keep the lines flat and horizontal — slab or flat-panel doors, no raised panels, no applied moulding. Keep the palette to a few natural materials rather than many. And give the clutter somewhere to live, because the calm depends on the counters staying clear. This Brush Prairie kitchen follows all three: frameless cabinetry with flat plain-sliced white oak fronts running to the ceiling, one stone used for both the counters and the full-height backsplash, a plaster hood that disappears into the wall, and a walk-in pantry so small appliances and dry goods never have to sit out on the work surfaces.
This kitchen was contracted in the $110,000–$140,000 range. That figure covers demolition and prep, framing for the new layout, relocating an interior door, reworking the plumbing and electrical, drywall, custom frameless cabinetry for the kitchen and the walk-in pantry, shop staining and finishing, quartz counters with a full-height quartz backsplash, an undermount sink, panel-ready refrigerator surrounds and a custom hood surround. Kitchen remodels across Clark County more broadly run from roughly $30,000 for a refacing-and-counters refresh to $100,000 and up for a large custom kitchen with layout changes. Custom cabinetry is the single largest line item in a kitchen like this one, because a Japandi look depends on flat, flush, full-height cabinetry that has to be built for the room rather than ordered as stock boxes.
Because it was dark, and no amount of lighting fixes a dark palette. The kitchen this replaced was not worn out or badly built — it was a recent, well-made kitchen with matte black cabinetry running to the ceiling, black uppers across the whole cooking wall, a black open-shelving unit and a wood-panelled island under a white quartz waterfall top. The problem was that the room has a bank of tall windows over the sink looking straight into trees, and black cabinetry absorbs that daylight instead of passing it around. The homeowners were not tired of the style; they liked the Japandi discipline and kept it. They wanted the same flat, quiet, full-height cabinetry in a palette that worked with the light the room already had. So the layout logic was largely retained and the surfaces were replaced wholesale.
You change what the surfaces do with the light you already have, in roughly this order of impact. First the cabinetry, because it is the largest surface area in the room by far — going from matte black to plain-sliced white oak on every run is the single biggest change, and it is why this room reads completely differently in the same daylight. Second the wall above the counters: a dark or busy backsplash eats light at eye level, so the backsplash here runs as one continuous stone from counter to upper cabinet. Third the hood, which in a Japandi kitchen is a large object at head height — swapping a dark band of cabinetry for a plaster hood finished like the wall makes it recede instead of loom. Fourth, replace closed dark storage at the end of a run with matching light cabinetry rather than open shelving, which reads as a dark hole when the interior is shadowed. Adding windows was never necessary; the windows were fine.
They can, and this project is a fair example of when they do. Matte black cabinetry is not a mistake in itself — it looks superb in a room with a lot of ambient light, or used on a limited run rather than floor to ceiling on multiple walls. The trouble comes from surface area and from height. When black cabinetry runs to the ceiling on two or three walls, it stops being an accent and becomes the room's dominant reflector, and everything else in the space gets whatever light is left. In the original kitchen here the black ran across the cooking-wall uppers, the full-height appliance run and the base cabinets beneath the windows, so daylight coming through a whole bank of windows had almost nothing bright to bounce off. If you want black cabinets, keep them low, keep them to one run, or make sure the counters, backsplash and walls are doing the reflecting.
Plain-sliced — sometimes called flat-cut — describes how the veneer is cut from the log, and it produces the long, straight, cathedral-shaped grain most people picture when they think of oak cabinetry. It matters most on exactly the kind of doors this kitchen uses. On a wide flat drawer front or a full-height door there is no frame, panel or moulding to look at, so the grain is the only detail, and plain-sliced oak stays calm and continuous across a big face where rotary-cut veneer reads busy and repetitive. The doors here were also drawn with vertical grain and finished with a stain and clear coat in the shop rather than on site, which keeps the colour even across every run.
For a flat, modern kitchen, yes — and for a Japandi kitchen it is close to a requirement. A framed cabinet has a face frame around the front of the box, which narrows the opening and puts a visible strip of material between the doors. A frameless cabinet has no face frame, so the door mounts straight to the box: you get the full width of the opening for drawers and pull-outs, and the fronts sit almost edge to edge with a consistent hairline gap across the whole run. That continuous flat plane is what lets the tall oak run in this kitchen read as one wall of joinery rather than a row of separate boxes, and it is what allows the refrigerator to disappear behind matching panels. Frameless boxes also gain roughly ten percent more usable interior volume for the same footprint. Framed construction still has its place — it suits inset and traditional shaker doors, which is a different kitchen entirely.
The part homeowners underestimate is the cabinet shop, not the construction. A kitchen of this size is typically six to eight weeks of on-site work, but custom frameless cabinetry needs its own design, shop drawings and sign-off before anything is cut, and then four to eight weeks in the shop to build, stain and finish. Those weeks run before and alongside demolition rather than after it. On site the sequence is fixed by inspections and by one hard dependency: stone can only be templated off cabinets that are already installed and levelled. So it goes demolition and framing, then plumbing and electrical rough-in with inspections, then drywall and paint, then cabinet delivery and installation, then the counter template and install, and finally hardware, appliances, trim-out, punch list and walkthrough.
Yes, for a project like this one. Brush Prairie is unincorporated Clark County, so permits and inspections go through Clark County Community Development rather than a city building department. Any kitchen remodel that reframes a layout, relocates plumbing or electrical, or moves an interior door needs permits, and all of that happened here. Serden Group is a licensed Washington general contractor (L&I # SERDEGL826PD) and Oregon CCB # 239429, and we pull and manage the permits and inspections as part of the project. Allow one to two weeks for permit review before demolition starts, and budget that time into the cabinet shop schedule rather than on top of it.

Want a kitchen like this in your home?

All Rights Reserved © Serden Group 2026 · Privacy Policy · Terms & Conditions

Built by synertech
Get a Free Estimate Call Now