Project Case Study

Warm Transitional White Oak Kitchen Remodel

Felida — Vancouver, WA 98685

The Ross family did not want a bigger kitchen. They wanted the one they had to stop fighting them: an angled peninsula that closed the room off, a sink jammed into its corner, a microwave mounted above the range, and dark maple cabinets with almost no storage worth using. We kept the layout broadly where it was and rebuilt everything inside it — a longer straight peninsula with the sink in the middle of it, a full-height pantry in what used to be a hall closet, custom white oak shaker cabinets from Moda Cabinets, and Crystal Grey quartz throughout. Six weeks, no walls moved, and a kitchen that finally belongs to the house it sits in.
Location
Felida
Vancouver, WA
Scope
Complete custom
kitchen remodel
Timeline
6 weeks
start to walkthrough
Investment
$65,000–$85,000
all-in
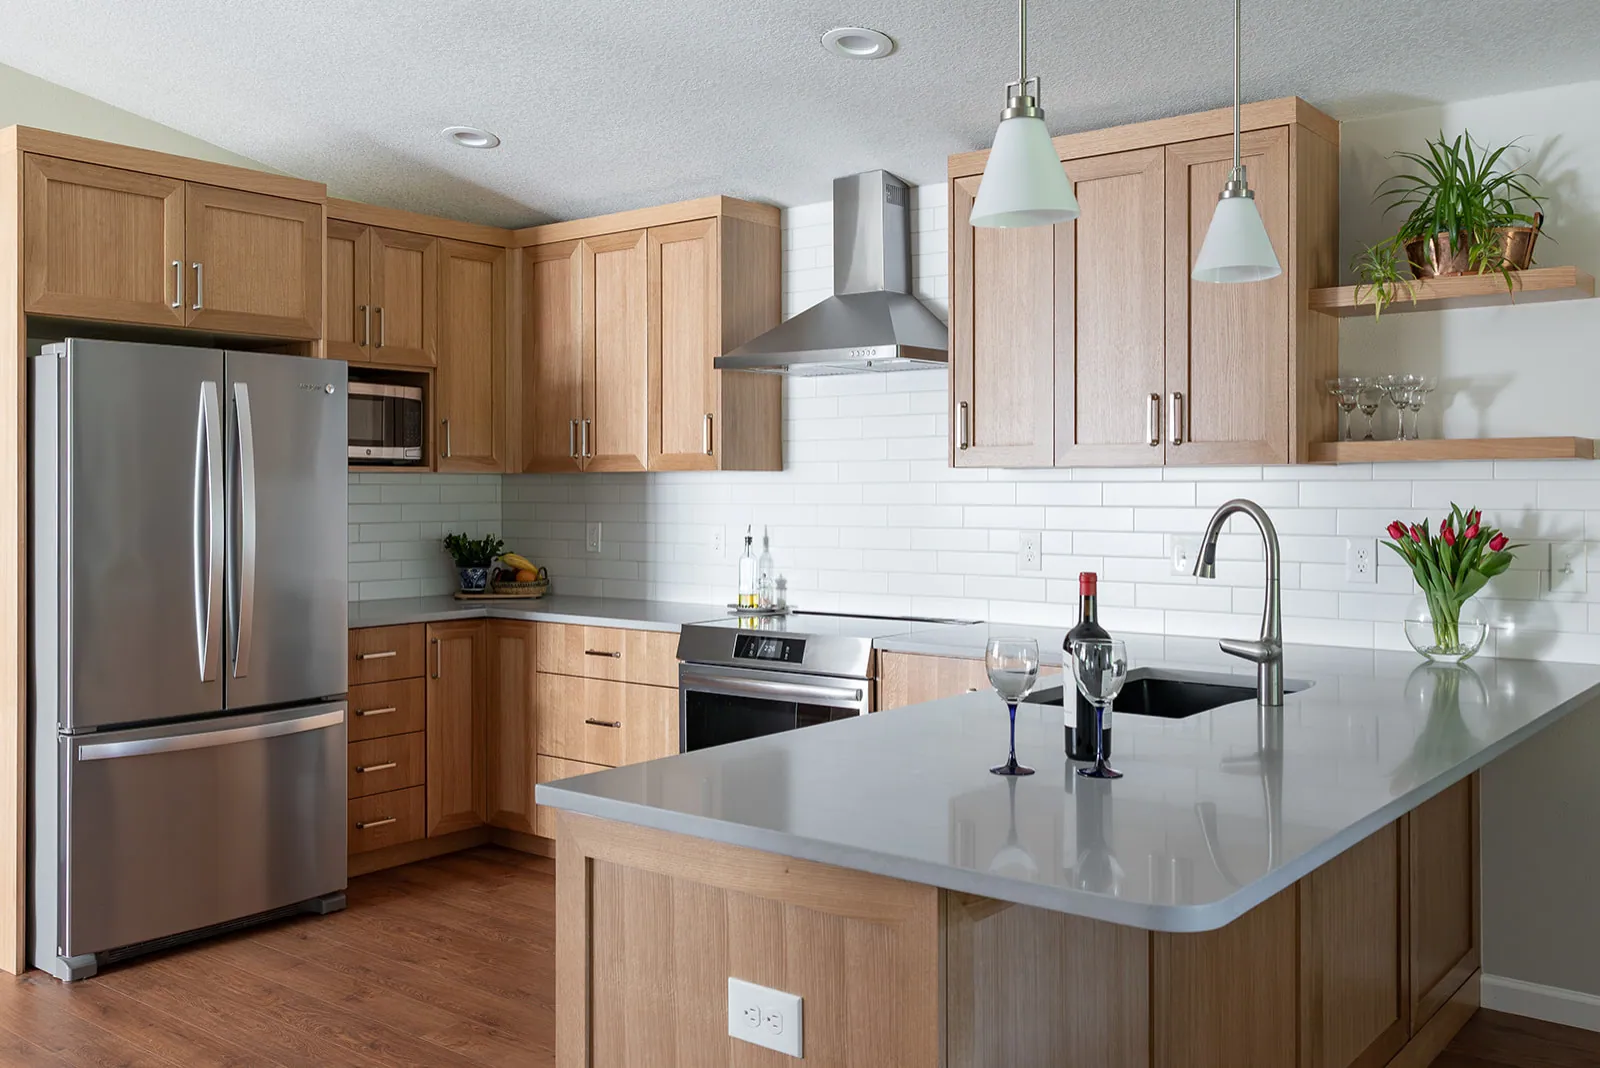
Finished white oak kitchen remodel in Felida, Vancouver WA, with a lengthened Crystal Grey quartz peninsula, white subway tile and a stainless chimney hood
The finished kitchen: the peninsula rebuilt longer and straight with the sink in the middle of it, the microwave in its own niche at counter height, and the full-height painted pantry on the left.
The Starting Point

What wasn’t working

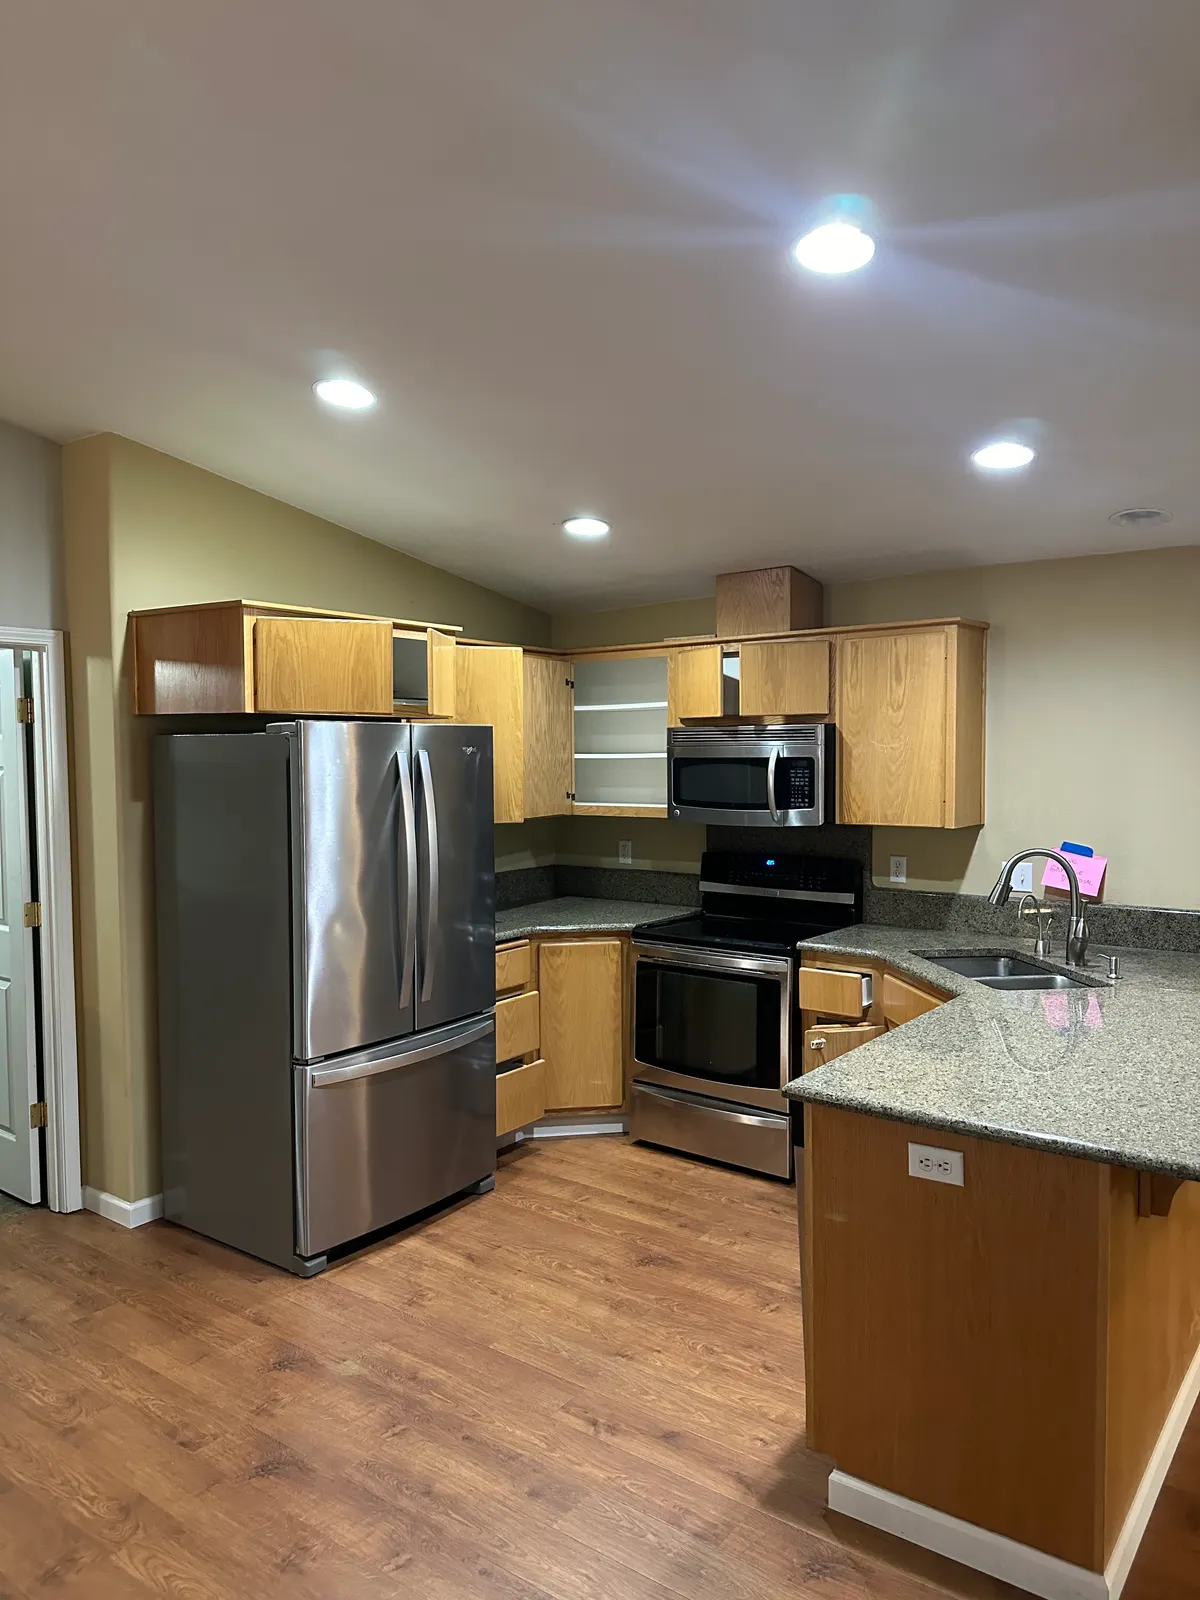
This is a 1990s Felida home with a good floor plan and a kitchen that had not kept up with it. The room was open to the great room on paper, but an angled peninsula ran across the opening and the sink sat in the corner of it, facing a return wall. Standing at the sink you were working in a pocket, with your back to the room and roughly a foot of counter to either side.

The rest of it followed from there. The microwave was mounted above the range, which put a hot appliance at eye height over a second one. Base cabinets were deep boxes with doors and fixed shelves, so the back half of every one of them was effectively lost. There was no pantry — though there was an unused closet recess in the hall right beside the kitchen, which turned out to matter a great deal. And the finishes, yellowed maple with dark green speckled granite, pulled the light out of a room that has a vaulted ceiling and windows on two sides.
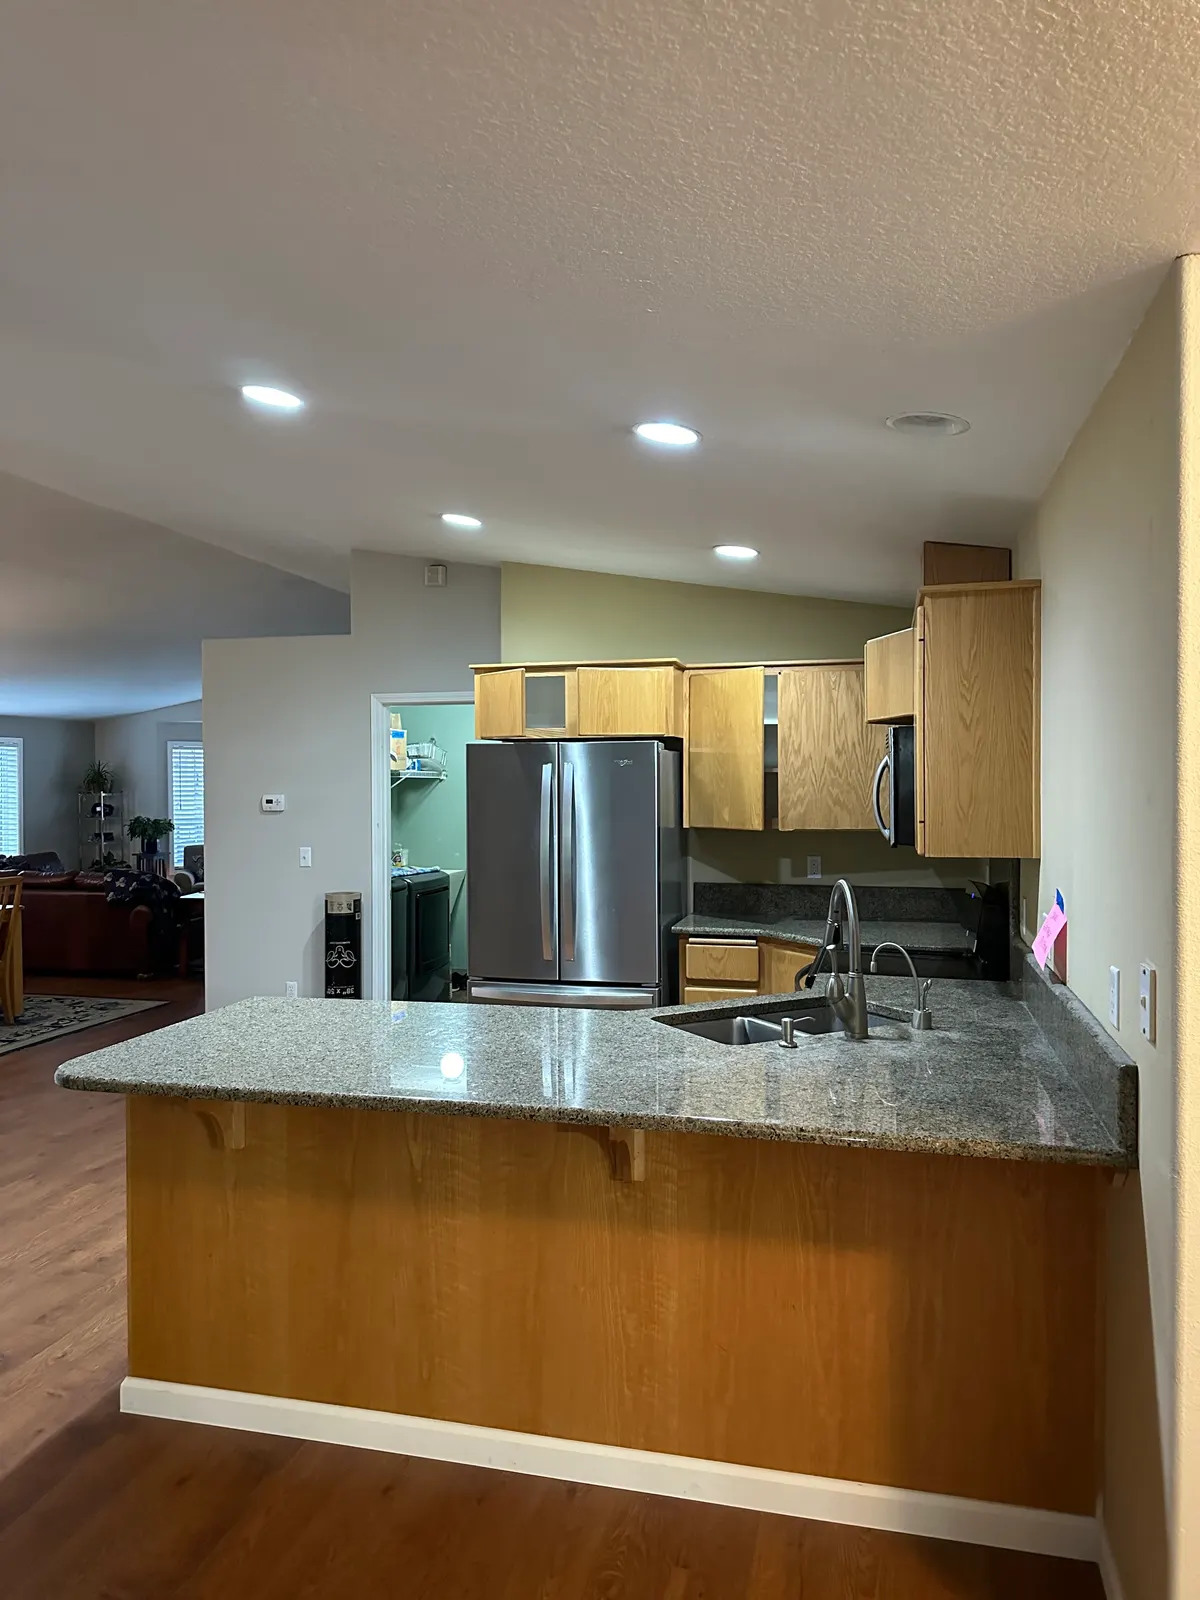
The original Felida kitchen before remodeling, with the sink pushed into the corner of a short angled peninsula and green granite counters
Before The sink in the corner of the angled peninsula
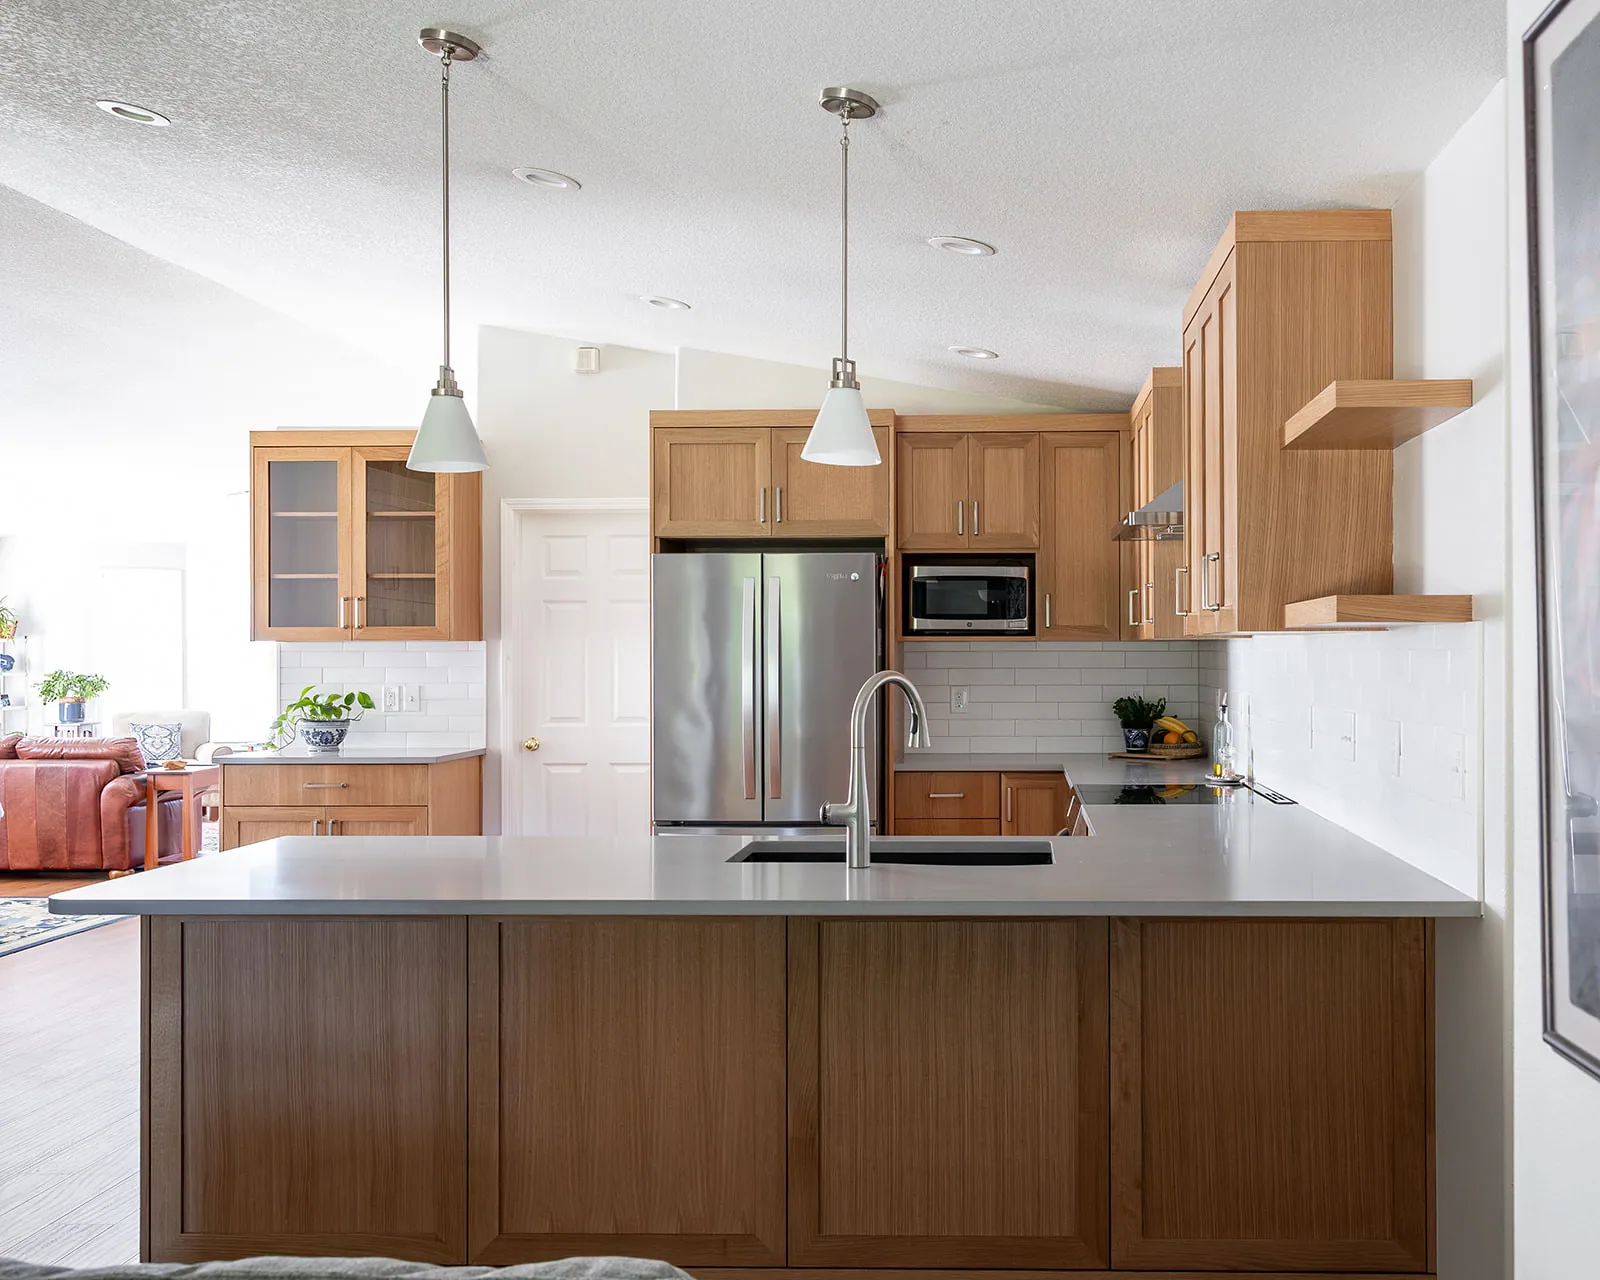
The same peninsula after remodeling, rebuilt straight and longer with the sink centered in Crystal Grey quartz
After Rebuilt straight and longer, sink in the middle
The original kitchen before remodeling, with yellow-toned maple cabinets, green speckled granite and the microwave mounted above the range
Before Dark cabinets and the over-range microwave
The same view after remodeling, with white oak shaker cabinets, a stainless chimney hood and the microwave moved into its own counter-height niche
After White oak, a chimney hood, and the microwave down at counter height

All five of the homeowners’ own photos of the original kitchen are below — select any of them to open the full gallery.

Design & Construction Solution

A complete redesign inside the same layout

The homeowners’ brief was specific, which makes a project like this much easier to design against:

Nothing on that list required moving a wall, and none of it required borrowing space from another room. It required spending the space the kitchen already had differently — which is exactly the kind of remodel custom cabinetry is for. Every extra inch of counter and every cubic foot of new storage in this kitchen came out of the same footprint, by rebuilding the peninsula, claiming an unused closet, and replacing door boxes with drawers.

Keeping the layout also kept the project to six weeks and kept the plumbing and electrical scope proportionate: the sink and dishwasher moved a few feet within the same run, the microwave got a new circuit, and the range hood got ducted. That is a very different job from relocating a kitchen.

01

Rebuild the peninsula longer — and move the sink into it

The angled peninsula came out and was rebuilt as a single straight run, several feet longer, square to the room. The sink moved out of its cramped corner and into the middle of that new peninsula, which is the change the homeowners notice most: you now stand at the sink facing the great room, with clear counter on both sides of the bowl instead of a wall on one side and a corner on the other.

02

Turn the unused hall closet into a full-height pantry

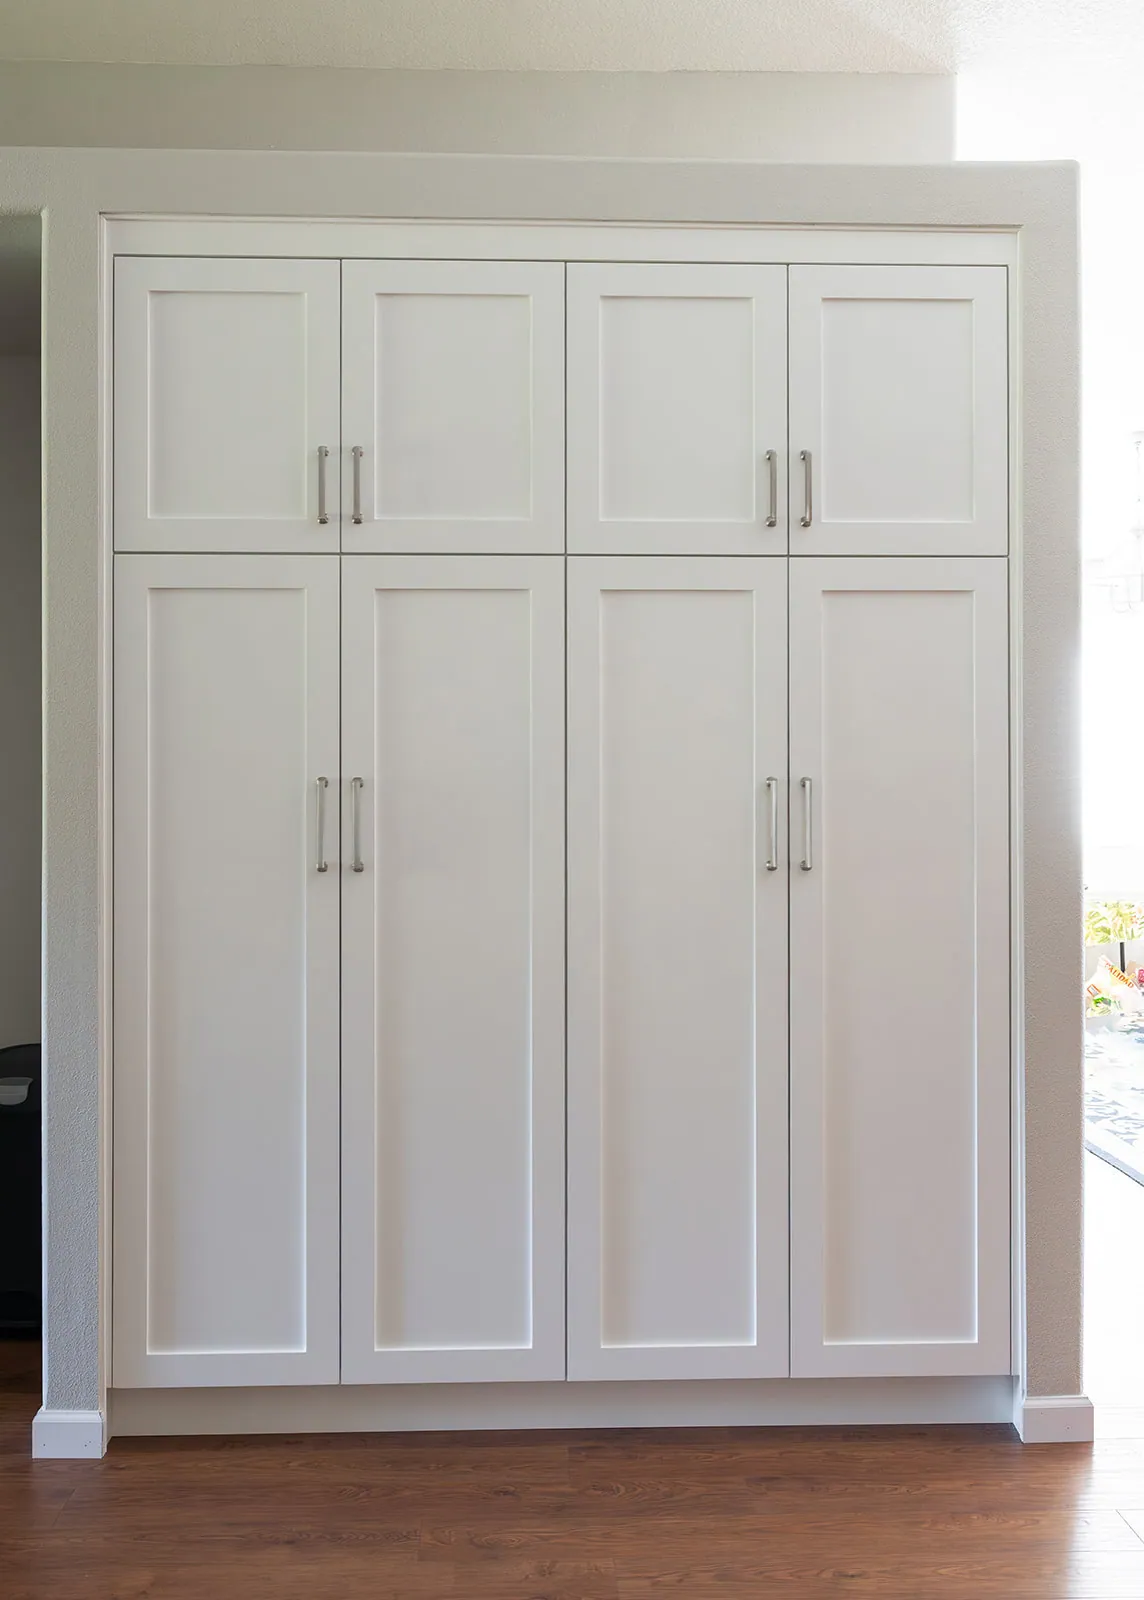
The recess beside the kitchen was doing almost nothing. Moda Cabinets built a full-height, eight-door pantry cabinet in paint-grade alder to fill it wall to wall and floor to ceiling. That single cabinet holds more than the old kitchen’s entire lower run, and it took no floor area away from the kitchen because the recess was already there.

03

Get the microwave off the range wall

The over-range microwave was the homeowners’ least favourite thing in the house. It now sits in its own open cabinet niche at counter height, above a bank of drawers, where it can be loaded and unloaded without reaching across a hot cooktop. A stainless chimney hood took its place above the range — which is what that wall wanted in the first place.

04

Trade doors for drawers and open up the corner

Nearly every base cabinet became a drawer bank. Drawers turn a deep, dark cabinet into storage you can actually see into, which is most of the reason the finished kitchen holds so much more without being any bigger. The corner was reworked at the same time so the counter now wraps continuously from the refrigerator past the range.

05

Brighten with white oak, white subway tile and a light quartz

The brief was to lighten the room without turning it cold, so the cabinets are stained white oak in a shaker profile — still warm, still wood, just no longer yellow. Crystal Grey quartz replaced the green granite, and Artisan Frost ceramic subway tile runs the length of the backsplash. Together they lift the light level noticeably while keeping the transitional feel of the rest of the house.

06

Finish with the details that make it read as one room

Glass pendants over the peninsula, white oak floating shelves beside the sink, a glass-front hutch cabinet by the laundry door, and brushed hardware throughout. Small moves, but they are what tie the kitchen to the living space it now opens onto rather than looking like a kitchen bolted to it.

Scope of Work

Everything that changed

The kitchen was taken back to bare walls and rebuilt. Our in-house crew handled design, demolition, framing, cabinet installation, tile and finish carpentry, with licensed, vetted trade partners on the plumbing and electrical scopes — the relocated sink waste and the hood duct in particular. One Serden Group project manager ran the schedule, the cabinet shop coordination and the inspections from the first walkthrough to the final punch list.
  • Design and layout drawings within the existing footprint
  • Full demolition of cabinets, counters, tile and appliances
  • Removal and rebuild of the angled peninsula, straight and longer
  • Plumbing relocated for the new peninsula sink and dishwasher
  • Electrical relocated for the peninsula, pendants and microwave niche
  • New dedicated circuit and ducting for the chimney range hood
  • Hall closet recess reframed to take a full-height pantry cabinet
  • Custom white oak shaker cabinets, built and installed by Moda Cabinets
  • Paint-grade alder pantry cabinetry, eight doors, floor to ceiling
  • Drawer banks throughout the base cabinets in place of door boxes
  • Templating and installation of Crystal Grey quartz countertops
  • Undermount sink, pull-down faucet and disposal
  • Artisan Frost ceramic subway tile backsplash, full run
  • Microwave cabinet niche, floating shelves and glass-front hutch
  • Pendant, under-cabinet and can lighting, plus new switching
  • Appliance installation, hood ducting and trim-out
  • Paint, trim and casing to match the rest of the home
  • Permits, inspections, punch list and final walkthrough
The full-height eight-door pantry cabinet in painted paint-grade alder, built by Moda Cabinets into what used to be an unused hall closet recess
Materials & Products Installed

What went into the kitchen

A transitional kitchen lives or dies on how its materials sit together — warm enough to match an established home, light enough to brighten it. These are the products this kitchen was built from, and who supplied them.

Main cabinets
Moda Cabinets custom white oak shaker cabinets, stained rather than painted so the grain still reads. Built to size in their shop for this kitchen — which is what made the longer peninsula, the microwave niche and the drawer-heavy base run possible as one integrated design rather than a set of stock boxes.
Pantry cabinets
Moda Cabinets paint-grade alder, finished in white. Alder takes paint cleanly and keeps a flat, even face across doors this size, so the eight-door full-height pantry reads as one built-in piece of joinery instead of a run of cabinets.
Countertops
Absolute Quartz — quartz in Crystal Grey. A light grey with soft movement, chosen to brighten the room and to sit quietly against the white oak. Engineered quartz needs no sealing and shrugs off the daily wear a family kitchen puts on a counter.
Backsplash
Floor & DecorArtisan Frost ceramic tile, laid as a subway field with a soft glaze that catches light rather than flattening it. Run the full length of the counter and up behind the range under the chimney hood.
Ventilation
A stainless chimney range hood, ducted out, replacing the over-range microwave. It vents properly, it is quieter than a microwave fan, and it gives the cooking wall the vertical focal point the old layout never had.
Hardware & lighting
Brushed pulls and knobs throughout, glass pendants over the peninsula, and under-cabinet lighting along the work runs. White oak floating shelves beside the sink and a glass-front hutch cabinet at the laundry door round the cabinetry out.
Project Timeline

Six weeks, week by week

Six weeks is a realistic number for a custom kitchen only when the cabinets are ordered early — a custom shop typically needs four to eight weeks to build, so those weeks run alongside demolition and rough-in rather than after them. The sequence below is dictated by inspections and by the fact that quartz can only be templated off cabinets that are already installed.

Week 1

Demolition and layout

Protect the route in, pull the old cabinets, counters, tile and appliances, and take out the angled peninsula. With the room empty the new layout gets snapped out on the floor and the hall closet recess is opened up and reframed for the pantry cabinet.

Week 2

Plumbing, electrical and rough inspection

Waste and supply relocated for the sink’s new position in the peninsula, dishwasher line run, circuits pulled for the pendants, the microwave niche and the range hood, and the hood ducted to the exterior. Rough plumbing and electrical inspected and signed off.

Week 3

Drywall, paint and floor prep

Patch and finish drywall where the peninsula and closet were reworked, prime and paint, and get the floor and walls flat and true. This is the quiet week, and it is also when the cabinets are being finished in the shop.

Week 4

Cabinet installation

The white oak shaker cabinets and the full-height painted pantry are delivered and set: scribed, levelled, fastened and aligned. The peninsula box goes in at its new length, and the microwave niche and floating shelves are built in.

Week 5

Quartz template, fabrication and install

Crystal Grey quartz is templated off the installed cabinets — which is why it cannot happen any earlier — then fabricated and set. Sink and faucet plumbed, dishwasher connected, appliances slid in and the range hood mounted.

Week 6

Tile, lighting and walkthrough

Artisan Frost subway tile set and grouted, pendants and under-cabinet lighting finished, hardware installed, trim and touch-up paint completed. Final inspection, punch list and a walkthrough with the homeowners.

“What an amazing transformation! Our remodeled kitchen is bright, open and efficient, with more cabinetry than we even dreamed was possible. A pleasure to use it.”

Mary R.

Google review — Vancouver, WA

Common Questions

About a project like this

This Felida kitchen landed in the $65,000-$85,000 range. That figure covers custom cabinetry built for the room by a local cabinet shop, Crystal Grey quartz countertops, a full ceramic subway backsplash, a rebuilt and lengthened peninsula, a relocated sink and microwave, a new full-height pantry, new lighting and ventilation, and all of the plumbing and electrical work behind it. Kitchen remodels around Vancouver more broadly run from roughly $30,000 for a cabinet-refacing-and-counters refresh to $100,000+ for a large custom kitchen with structural changes. Custom cabinetry, stone and appliance relocation are the three line items that move a kitchen into the upper range.
This project ran six weeks from demolition to final walkthrough, with the custom cabinets already built and waiting before demolition started. Week one was demolition and setting out the new layout, week two was rough plumbing and electrical with inspections, week three was drywall and paint, week four was the cabinet installation, week five was the quartz template and install followed by the backsplash tile, and week six was trim-out, the hood, floating shelves, punch list and walkthrough. The part homeowners underestimate is what happens before week one: custom cabinetry typically needs four to eight weeks of shop time, so the design has to be finished and signed off well ahead of the demolition date.
Usually, yes. Not one wall moved in this kitchen and the footprint is unchanged, but the usable storage and counter space both went up substantially. Three moves did it: the peninsula was rebuilt longer and deeper so it carries a real run of counter instead of a narrow bar ledge, the cabinet layout was redrawn so the corner and the dead filler space became drawers, and an underused hall closet next to the kitchen was rebuilt as a full-height eight-door pantry. Moving walls is expensive and slow; redrawing what sits against the existing walls is where most of the gain actually is.
White oak is one of the most durable and stable cabinet woods available, which is why it holds up well in a working kitchen. Its open, straight grain reads as warm and current rather than orange, and it takes a stain evenly, so you can keep the wood character visible instead of burying it under paint. For this kitchen the homeowners wanted to stay with wood so the room matched the rest of the house, but wanted it lighter and calmer than the yellow-toned maple they had. A stained white oak shaker door in a full-overlay layout delivered exactly that.
Because the two cabinet runs are doing different jobs. The main kitchen cabinets are the feature, so they were built in white oak with a stain that shows the grain. The pantry sits in a recess outside the kitchen proper, along a painted wall, and reads better as built-in millwork than as furniture, so it was built in paint-grade alder and finished white to disappear into the wall. Alder is the right substrate for that: it is a smooth, tight-grained, dimensionally stable hardwood that takes paint cleanly without grain telegraphing through the finish. Specifying white oak for the pantry would have cost more and looked busier.
For most kitchens, yes. Quartz is non-porous, so it never needs sealing and does not stain from wine, oil or citrus the way some granites will, and it is manufactured to a consistent pattern, so the slab you approve is the slab you get. This kitchen replaced a busy green speckled granite with Crystal Grey quartz, a quiet mid-grey that reads as a solid surface from across the room. That was a deliberate choice: with a wood-heavy kitchen, a calm countertop keeps the room from looking cluttered. Granite still wins if you specifically want natural stone movement and are willing to seal it.
Almost anywhere other than above the range, which is where this kitchen had it. An over-the-range microwave forces you to reach across hot burners with a hot dish, it sits too high for shorter people and children, and it wastes the best spot in the kitchen on a weak ventilation fan. Here the microwave moved into its own open cabinet niche near the refrigerator at a comfortable height, which freed the range wall for a proper stainless chimney hood that actually vents. A drawer microwave in a base cabinet or an island is the other good answer.
Yes, for a project like this one. Any kitchen remodel that relocates plumbing or electrical - moving a sink, adding circuits, adding a vented range hood - requires permits through the City of Vancouver or Clark County depending on the address, and Felida addresses fall under Clark County jurisdiction. Serden Group is a licensed Washington general contractor (L&I # SERDEGL826PD) and Oregon CCB # 239429, and we pull and manage the permits and inspections as part of the project. Allow one to two weeks for permit review before demolition starts.

Want a kitchen like this in your home?

All Rights Reserved © Serden Group 2026 · Privacy Policy · Terms & Conditions

Built by synertech
Get a Free Estimate Call Now